Build this simple slaphappy push toy.
Overall dimensions: 2"w × 9 1⁄2"l × 4 5⁄8"h
Ever since I designed and built my first animated toy three decades ago, I have strived to make toys that not only capture the look of an animal, but also have a little life of their own. Unlike Pinocchio’s Geppetto, the trick to making a toy waddle, chomp, or thump isn’t magic, but simple mechanics.
This beaver is one of my easier projects, but despite its simplicity, the design still delights both young children and the young at heart. Thanks to a cam hidden within the solid-wood body, the tail rises and falls as it’s rolled in either direction. (When the toy is pushed quickly, the tail makes a hard slapping sound, much like the real beavers that I’ve startled on canoe trips.) You could carve some additional detail into the tail and body sides if you are so inclined, but I prefer not to go overboard with finishing and detail work. I don’t want to make toys that are too pretty to play with.
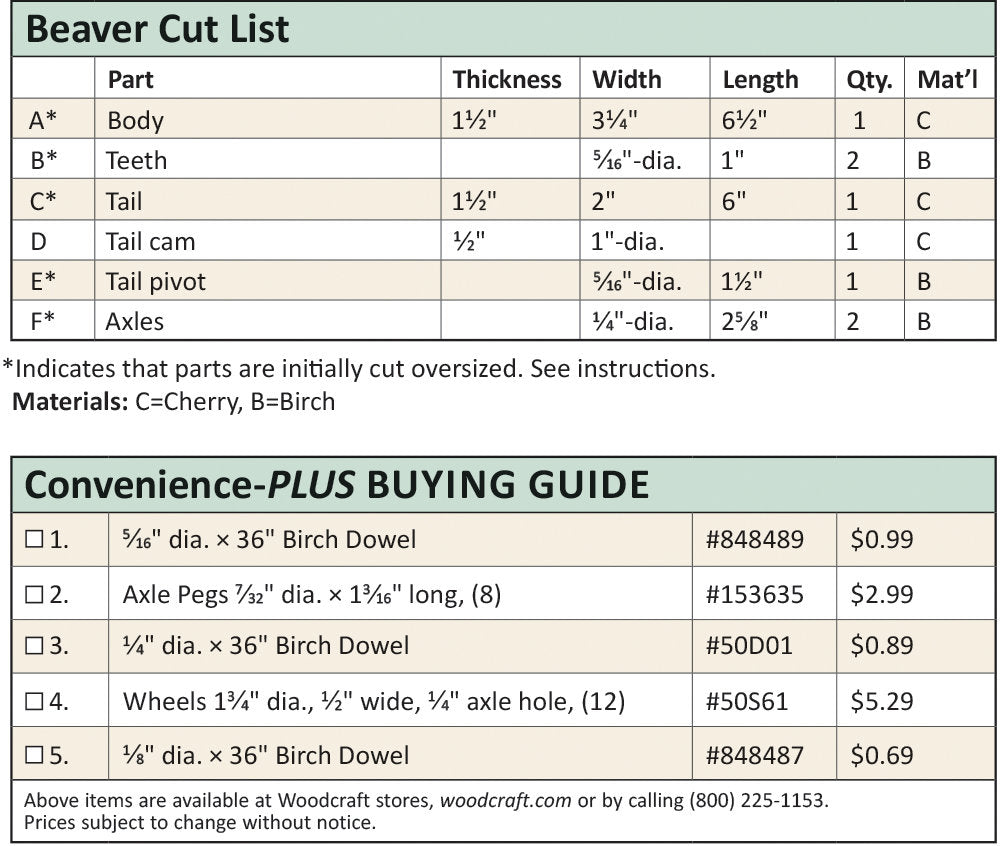
I made this beaver from cherry, but any relatively light, strong hardwood will do. This toy is easy to make, but it does require some precise machine work and careful assembly to guarantee that the moving parts operate smoothly. Machining small parts warrants special attention. I’ve provided some advice for safe operations, but if any step seems too close for comfort, stop and use another safer method. For example, if you’re nervous about routing small parts, feel free to resort to files and sanding blocks. Considering the small amount of shaping involved, completing the parts with hand tools would not add much time to this project.
I hope that you enjoy making this toy for your friends and family, but I trust that you will honor my copyright and not make this or any of my designs for sale.


Clamp the body to a fence to maintain a consistent tooth angle. Use a scrapwood stop to ensure identical nose-to-tooth spacing.
Tip Alert: Routing curves using a series of light, glancing passes tends to produce fewer burn marks than keeping the wood in constant contact with the bit.
Make the body
1. Cut out and affix the full-sized body (A) pattern found on page 71 onto a 11⁄2"-thick block that’s at least 31⁄2" wide and 63⁄4" long. (If you can spare the stock, a wider, longer block will be safer to handle on the tablesaw.) Position the pattern so that the groove shown in Figure 1 runs parallel with the bottom edge of the block.
2. Referring to the pattern, use a drill press to bore through-holes for the eyes, axles, and tail pivot. Place a scrap of wood beneath the block to prevent tear-out.
3. Referring to Figure 1 and the body (A) pattern, lay out the shoulder lines for the 3⁄4"-wide stopped groove on the beaver’s rear end, centering it across the thickness of the body. Next, set up a 1⁄2"-wide dado head on your tablesaw, adjust its height to 1", and then strike a line on your saw table indicating where the front of the cutter meets the plane of the table. Adjust the fence to saw to one of the groove shoulder lines, and start the cut. When the trailing end of the groove’s profile line on the pattern meets the mark on your saw, hold the block in place while you turn off the saw and wait for the blade to stop. Next, adjust the fence to cut the opposite groove shoulder, making the second cut in the same manner.
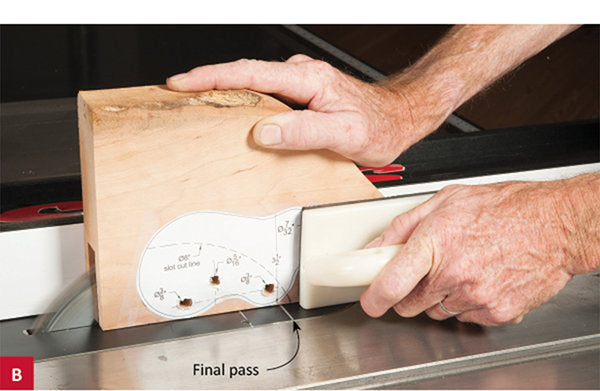
4. Using the pattern as a guide, raise the cutter to final height, mark a second stop line on the saw’s table (Photo A), and complete the stopped groove using the same two-step approach (Photo B).
5. Outfit your bandsaw with a 1⁄4"-wide, 4-6 TPI blade, and cut out the body profile.
6. At the drill press, position the body (A) upside-down with the beaver’s forehead resting against the table, as shown in Photo C, and drill two 5⁄16" holes for the teeth (B).
7. Remove the pattern, and then sand the edges and both faces of the body (A) through 120 grit. (You can use an oscillating spindle sander, but I prefer a 1"-wide belt sander (Photo D). To better negotiate inside curves, I ripped a 1" dowel in half and screwed it to the platen.)
8. Rout the entire body (A) with a 1⁄4" quarter-round bit. (When shaping small parts, I prefer to clamp my compact router table to my workbench and use it like a mini router table. See Photo F, page 70.) Lastly, hand-sand the routed edges through 120 grit.
9. Cut two short pieces of 5⁄16" dowel for the teeth (B). Lightly chamfer an end of each tooth, and then glue that end into the body (A). Once inserted, use a bandsaw to even out the lengths of the teeth, and then cut the inside curves. Use a round file or sandpaper-wrapped dowel to remove saw marks.
10. Trim the shafts of two axle pegs to 3⁄4" in length to make the eyes, and then glue them into the body (A).


Make the tail
1. Cut out and affix the tail (C) side view pattern to a 1 1⁄2"-thick block that’s 2" wide and at least 6" long. Position the pattern so that the tail’s back edge touches the end of the block and its bottom edge touches the bottom edge of the block.
2. Using a drill press, bore the 3⁄8" through-hole for the tail pivot (E). Now, bandsaw the profile, and then sand the top and bottom faces through 120 grit.
3. Affix the tail (C) top view pattern to the top face of the block, again aligning the pattern’s back edge with the corresponding end of the block. Next, attach a fence to the bandsaw, hold the tail firmly against the table and cut the shoulders of the pivoting section (Photo E) so that the tail can fit into the body (A). Next, saw the round rear section, and then finish-sand the tail through 120 grit.
4. Rout the tail’s round section with a 1⁄4" quarter-round bit. The angle of the tail makes routing the top face a little tricky. Using a compact router helps (Photo F), but the angled section limits the bit’s reach, so use a rasp to finish shaping the tail, and then finish-sand through 120 grit.


Make the cam and add the wheels
1. From 1⁄2"-thick stock, use a 1" holesaw to make the tail cam (D). Plug the hole created by a holesaw with a dowel, trim it flush, and then bore a 1⁄4" through-hole, where shown on the Patterns page.
2. Cut the tail pivot (E) about 1⁄8" longer than the width of the body (A), and lightly round over one end to prevent it from snagging any edges when inserted through the body and cam. Next, position the body (A) on its side, and fit the tail (C) in the groove. (It may help to position the body so that the tail hangs off the edge of your bench). Begin tapping the tail pivot through the body and tail, and stop when the dowel just enters the hole on the far side of the body. Put a little glue on the inside of the pivot hole, and then drive the dowel home. Wipe off excess glue from the dowel, and then trim both ends flush.
3. Cut the axles (F) to length and again round over one end to prevent snagging. Apply glue inside a front wheel, place it on wax paper, and tap an axle in place. Repeat with a back wheel and axle.
4. Put a dab of glue in the remaining front wheel. Rest the body (A) on its side, place the wheel under the front axle hole, and then insert the front axle from the top. (You may need to tap the axle with a hammer to drive it home.)
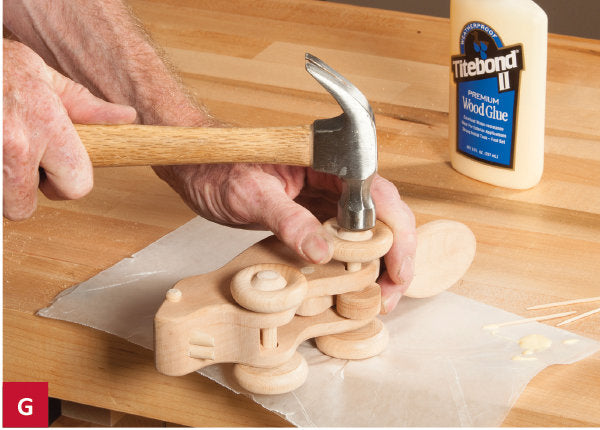
5. Insert the rear axle (F) into the body (A), and through the tail cam (D). Set the remaining free wheel under the body (I suggest positioning the assembly directly over a dog hole), and fit the axle about half-way into the wheel (Photo G). Apply glue in the wheel hole, and then drive the axle home. Once the glue has cured, edge-sand the axle ends.
6. Drill a 1⁄8" hole through the tail cam (D) and rear axle (F), and pin the cam to the dowel with a 1⁄8" dowel. Afterward, make sure to smooth away any projection, which can interfere with the lifting motion of the tail.
7. Finish the toy and give it away. Enjoy the show as your youngster figures out how the beaver seems to move on his own.
If you’re planning to use paint or a hard film-building finish, do so before assembly; otherwise, excess finish may gum up the inner workings of your toy.
Finishing Touches
I finish most of my toys with food-grade mineral oil because it’s non-toxic and easy to use. Simply apply it liberally with a rag, let it soak in, and then wipe away any excess. Reapply if the wood begins to look dry.

About Our Author
David Wakefield has been designing and building wooden mechanical toys for more than 30 years. This is his third project for Woodcraft Magazine; David’s Waddling Walrus was featured in Issue #57 and his Chomping Shark in #59.

