By David Heim
I’ve taught and demonstrated SketchUp for several years now, and I’ve seen beginners make the same mistakes again and again. Here are the most common slip-ups and my advice for avoiding them.
1. My model is just a mess of random lines and shapes!
The solution: Always make shapes into components.
SketchUp is a virtual workshop and components are your virtual boards. This is by far the most important concept to keep in mind when working with SketchUp.
Suppose you’ve created the side of a bookcase, but tried to add a shelf before making any of the shapes into components. As soon as you put the shelf in place, it will stick to the side. When you try to move anything, all the shapes will twist and distort and you’ll be stuck with a hopeless mess.
So, as soon as you create a shape with the right dimensions, triple-click it to select everything. Type the letter G to open the Component Maker window. Give the component a name and click Create.
Now you can add other parts to your model—shelves for that bookcase, say, or stretchers to connect table legs. Just be sure to make each new part a component.
As you continue working on the model, you will undoubtedly see why working with components is so critical. When it’s time to add some joinery—tenons on the ends of a stretcher, mortises in a leg, and so on—you only need to modify one of the components. Every other copy of that component will instantly get the same change in the same place. Not only will that save you time, it also ensures that your model stays accurate.

Looks are deceiving. You may think I’m adding a shelf to a case. But neither shape is a component. This is just a loose collection of lines.

Yuck! When I try to move the shape that looks like a shelf, everything gets twisted and distorted. Time to start over.

Powerful. When you change one component, every copy of the component gets the same treatment. Here, I’ve copied through-tenons on a shelf, using an extra copy of that component. As you can see, the originals get the tenons, too.
2. The parts don’t line up correctly!
The solution: Draw parts in place to keep measuring and moving to a minimum.
If you create new parts off in space and try to drag them into place in the model, you’ll waste a lot of time positioning the part. And no matter how much effort you exert, part A may wind up ever so slightly misaligned with part B.
So, when you want to connect table legs with a stretcher, get the legs in position first. Use the Tape Measure tool to lay down guidelines to follow, just as you do with real tools so you know where to cut, drill, chop, and move. When you have the legs where you want them, use the Line or Rectangle tools to draw the face of a stretcher right in place between a pair of legs. Always watch for the color-coded prompts and pop-up notes that SketchUp provides to keep your model accurate.
It also helps to use the Tape Measure tool and the Measurements box to lay down accurate guidelines that will help you position parts. Here’s how to do that: Click the Tape Measure tool’s cursor where you want to begin a measurement. This is just like hooking a real tape onto the edge of a board. Begin dragging the cursor in the proper direction. Let go of the cursor momentarily and type the number representing the inches between the starting point and ending point for the Tape Measure; if you want table legs 24 inches apart, for example, type 24 and press Enter. The Tape Measure will snap a guideline at that exact spot.

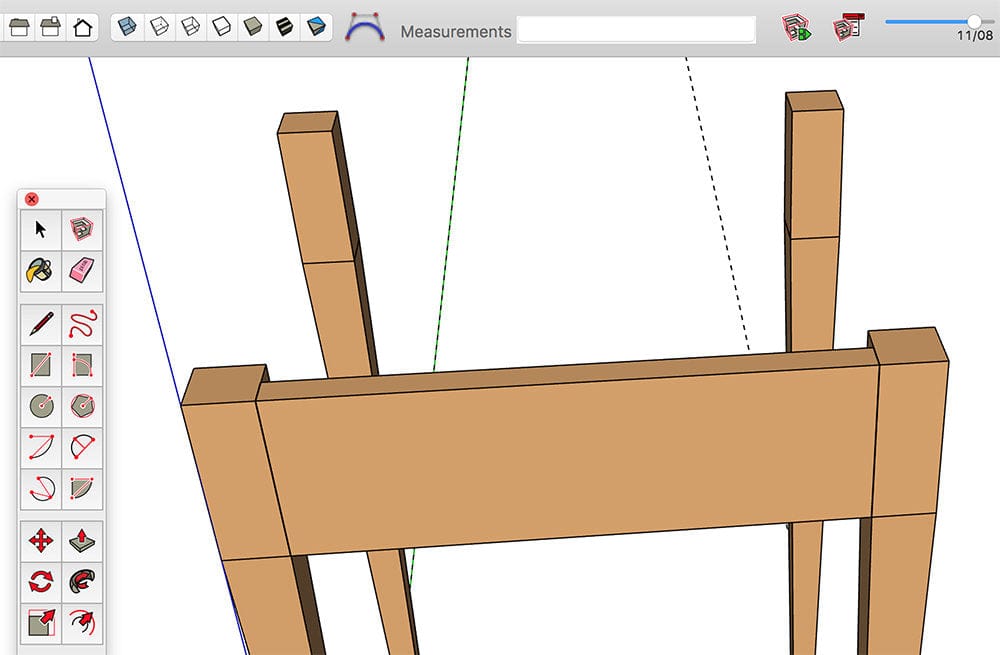
Anything wrong? At a glance, the stretcher for this table seems to be in the right place.

Oops. Zoom in close, though, and it’s clear that the stretcher hasn’t stretched all the way.

Draw in place. To be sure parts fit properly, draw them in place. Here, I’m using the Rectangle tool to outline the stretcher. Colored dots at opposite corners and pop-up prompts tell me that the stretcher will be a tight fit between the legs.
3. Some parts have little triangular holes or missing faces!
The solution: Go big.
A model infected with tiny holes or missing faces is a problem that you may face when you use the Follow Me tool to shape an object like a drawer knob or a turned table leg. In SketchUp speak, the tool is extruding a shape along a path. If the shape contains small, tight curves, for example, they may not fill in properly once you have extruded the shape. That’s because SketchUp ordinarily can’t fill in very small areas. But it can if you make the shape a component and enlarge it before using the Follow Me tool.
So, begin by making a copy of the component and using the Scale tool to enlarge the copy 10, 100, or even 1000 times. (To do that, click once on the component, then click once with the Scale tool. Grab one of the corner handles that appear, type 10, 100, or 1000, and press Enter.) Zoom out to view the enlarged copy, double-click it, and extrude the shape. Orbit around to be sure the shape looks OK. When you’re done, delete the big copy. Zoom back in to view the small original. It will be fine. This technique is known as the Dave Method, after Dave Richards, one of the best SketchUp jockeys around.
If that seems confusing and contradictory, remember this: When you make a change to a component, you get the same change to every copy of the component. By working on the large copy, you’re making a shape that SketchUp can fill in without a problem. The smaller original won’t have the problem either.

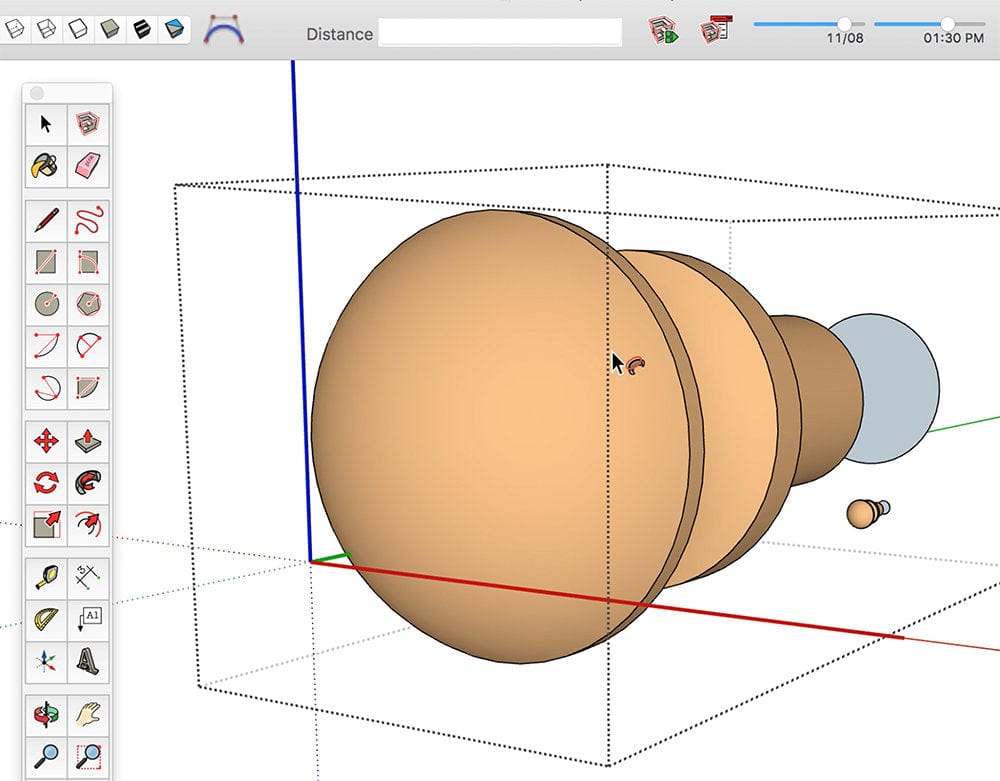
Problem knob. You use the Follow Me tool to shape parts like this small drawer knob. But if shapes are too small, you’ll get holes where you don’t want them.

Go big. To make solid-looking shapes, use the Scale tool to enlarge a copy of the component. Here, I’ve enlarged the copy 10 times.

Solid. No missing areas on the scaled-up copy. And, as you can see, the small original is solid, too.
Bonus mistake: I lost everything when SketchUp crashed!
The solution: Save your model early and often. Do not ask how I know this.