

Classic joinery makes for durable, long-lasting drawers

If you’re going to invest the time and effort to make a high-quality piece of furniture such as the heirloom dresser, you’re going to want to put the same kind of care into making the drawers as you do into making the rest of the piece. To me, this means dovetail joinery: half blinds at the front, and through at the rear. I also like to include drawer slips, small pieces of wood glued to the inside of the sides that hold the bottom and widen the surface that slides on the web frame inside the cabinet. Not only do these make the drawers slide better, they also allow me to make thinner drawer sides which are less expensive because I can make them from resawn stock. Thinner drawer sides also makes the overall weight of the cabinet lighter. While you could certainly handcut the dovetails, when I have a significant number of drawers to make, I take the time to set up a dovetail jig such as the Leigh DR4Pro with variable spacing. With this jig, I can design the depth of the drawers to fit my aesthetic, rather than being locked into whatever arbitrary spacing a fixed-spacing dovetail jig relies on (or having to make my joints asymmetric). Note, this article isn’t intended to show you exactly how to use the Leigh Jig, their manual is excellent. Instead it is meant to provide an overview of drawer-making no matter how you cut the joints.
Stock preparation and layout
Most woodworkers use a less expensive wood for drawer sides and backs, saving their premium stock for drawer faces. For drawers such as the one shown that slide on the wooden structure of the case rather than relying on mechanical hardware, I prefer a harder species. Here, I’m using soft maple for the sides, back, and slips with showier quartersawn sycamore for the faces and 1/4" plywood for the bottoms. I purchased 5 / 4 maple and resawed it to make the thin stock I needed. Do your resawing as early in the build as you can and place the pieces on stickers as shown to allow it the maximum amount of time to adjust to its new environment before milling to final size. After milling, sticker your stock again until you are ready to glue up. Build the case first, then cut the drawer fronts and sides to fit in the drawer cavities, with the drawer backs 5/8" narrower in width. Be sure to cut an extra piece or two for spares and to serve as setup stock. Sand all the inside faces before laying out the joints on your setup stock as shown. I find it easier to lay out the pins first. When I’m happy with the spacing, I lay out the mating tails on a second piece of setup stock. Note that most dovetail jigs rely on a 14° bit. However, if you’re using the Leigh Jig, you have a choice of what angle bit to use. This, in turn, dictates the length of the overlapping tails in the half blind joint between the drawer and front.

Sticker for stability. After resawing, stack your stock with lengths of scrap in between and weight on the top. This will give the pieces a chance to acclimate. After several days, joint and plane all the pieces to final thickness. I went with 7⁄16" sides and back for a 7⁄8"-thick front.

Divide evenly. I usually space my dovetails evenly. To divide a piece with an uneven width into equal spaces, measure across it diagonally, pivoting the ruler until you come to a number easy to divide. Here I measured to 8" which divides evenly by 2.

Pin layout. Dividing the width into four spaces gave me five pins. Two half pins at the outside and three full pins in between. For a 5⁄8" overlap as shown, the dovetail angle is 10°. Don’t worry about being too precise, just get an idea of what the joint will look like.
Rout the joints
Both sides of the joint are cut with the same bit. With some jigs, the entire joint is cut at the same time with both pieces clamped down at once. With the Leigh Jig, the pins and tails are cut separately. Adjust the moveable fingers to match your tail layout on the drawer side as shown. Set the bit’s cutting depth. If you’re using a 10° bit, the depth is 5/8". Rout the tails, guiding the router along the appropriate side of the template. Clamp the pin board (drawer front) to the top of the jig, flip the template and rout the pins. Test the fit and adjust the bit’s cutting depth if necessary, raising the bit to tighten the joint and lowering it to make it looser. Repeat the process with the appropriate bits to cut the through dovetails at the back of the drawer.

Set the template spacing. With the tail board (drawer sides) clamped to the front of the jig, adjust the template spacing to match the layout you drew earlier.

Rout the tails. Make a light pass across the piece from right to left, climb cutting to establish the shoulder line. Then follow the template from left to right to cut the tails.

Rout the pins. Clamp the pin board (drawer front) to the top of the jig. Flip the template and rout the pins. The board you see clamped to the front of the jig serves as a stop for helping to locate the pin board.

Test and adjust. Check the fit and adjust the bit height as needed. If you need to make another test joint, cut off the first one as you can’t simply recut it. Then cut all the good pieces.
Glue and finish up
Mill stock to 1/2 × 7/8" for the slips and make their length equal to the drawer depth less the thickness of the front. Rout a 1/4 × 1/4" groove for the bottom on the inside face of the drawer front, 3/8" in from its lower edge. Also rout the slips with the same setup. Spread glue on the mating surfaces of the dovetails, assemble and clamp. I position the side-to-side clamps just to one side of the joints so as not to interfere with how the joint pulls together. After the glue dries, handplane to make the joints flush and to fit the drawer in place.
Notch the rear end of the slips to accommodate the drawer back. Glue them in place along the sides. Sand everything before sliding the bottom in place. Screw the bottom to the drawer back to lock it in place. That way you can remove it easily if you ever have to replace it. Drill the front for the pull(s). Finish, then screw the pulls in place.

Clamp and check. Clamp the drawer together in both directions. Check for square by measuring the diagonals. I prefer a folding rule for this task as the ends fit right in the corners. Take your reading from how far the brass slider extends.
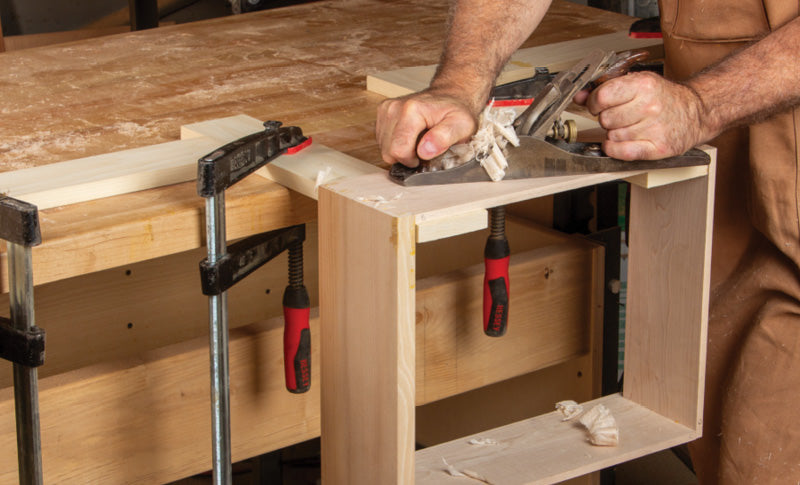
Flush and fit. Cantilever two boards off your bench to support the drawer as you plane its sides. Your goal is to make the joints flush and the drawer slide into its opening. Be careful not to chip out the front as you work.

Add the slips. After notching their rear ends, glue and clamp the slips in place. Double check to make sure the grooves in the slips align with the one in the front.

Slide in the bottom. Cut the bottom to size and slide the bottom in from the rear. Even though I used plywood, I still prefer to run the grain from side to side as you would with solid wood.