
A turned toy that’s curiously addicting
With two kids of my own, and a handful of nieces and nephews of all ages making frequent appearances at the house, I take care to keep a few simple games and toys about to entertain them. I recently added this ball-and-cup game to my collection. The kids enjoy it as do their parents. In addition to all the fun you’ll have playing with it, I think you’ll find making the game teaches a few useful skills along the way.
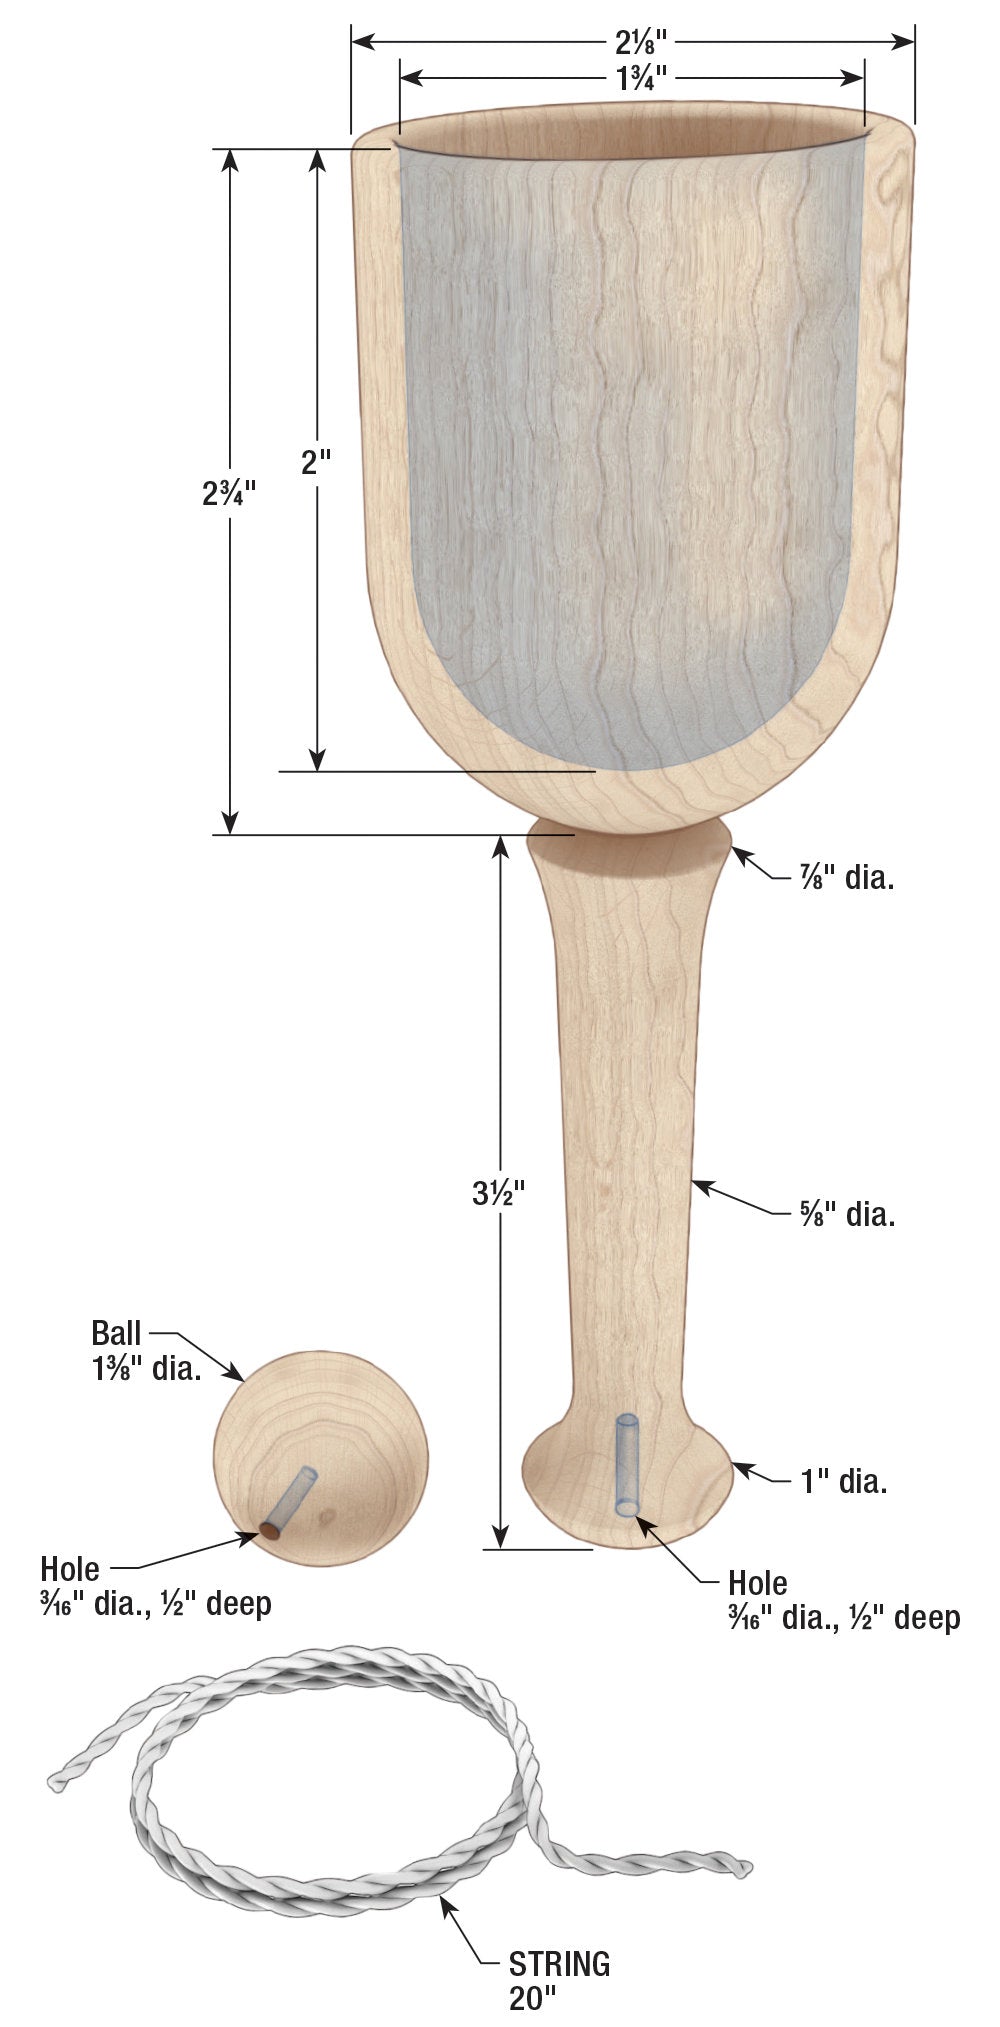
Shaping and drilling the cup is a simple process—and you can alter the dimensions to fit just about any hand. Turning the sphere might seem tricky, but a simple shop-made gauge makes it easy and repeatable, so you can make everyone on your list a game of their own. And sphere-turning is a good skill to master for any turner. In fact, the toughest part of this addicting game is actually catching the ball in the cup. But trying to master that skill keeps the kids, cousins, and other kin entertained for hours. Meaning I can slip away to my shop and some other turning projects!
 Order of Work
- Turn tenon between centers
- Rough out handle
- Drill out cup
- Finish and part off cup and handle
- Turn and finish sphere
- Attach parts with string
Turning round and round
Both the cup and ball are turned from the same hardwood blank. Turn the cup first, from the portion of the blank nearest the tailstock. Drill out the cup with a series of Forstner bits, starting small and working up because you’ll be drilling into end grain. After shaping the cup and handle, part them off. Then turn the ball from the remaining stock, using a simple gauge to check for sphericalness.
Rough-turn the shape
Mount a 3 × 3 × 9" blank between centers and rough it round. I use maple or ash, but any hardwood will do. If you want to make multiples, I’ve found that a baseball bat blank will produce four full ball-and-cup games, meaning all the kids (or adults) get matching games. Turn a tenon at one end, sized to fit your scroll chuck, and remount the blank.


Turn the toy and hollow the cup
With the blank mounted in your scroll chuck, lay out the lengths of the cup and its handle. Rough out the cup and handle shape, before drilling the cup’s interior. Note, if you regularly drill into endgrain, using carbide-tipped Forstner bits makes this task easier. After cleaning up and rounding the inside of the cup, finish shaping the outside. Stabilize the workpiece with a conical live center as you finish the shaping. Sand, finish, and saw off the toy, leaving material in the scroll chuck for the bowl.

Rough the shape. Use a parting tool to make notches near the top and bottom of the handle, leaving the blank 1" in diameter at these points. Then turn away the waste in between with a spindle gouge.

Drill the hole. Swap the live center in the tailstock for a Jacobs chuck and drill the cup’s interior using a series of successively larger diameter Forstner bits. Wrap masking tape around the bits’ shanks about 11⁄2" from the end to indicate the drilling depth.


Make the ball, assemble, and have fun
Turn the remaining blank to a 1-1/2" diameter cylinder, then clean up the end. Turn the ball as shown, checking for sphericalness often. After turning the ball, hold it securely in a clamp and use your drill press to bore a 3/16" diameter hole partway through the ball. Drill the same-size hole in the bottom of the cup handle. Connect the parts by gluing one end of a 20" length of string into each hole. A longer string or a smaller ball will make the game easier.


