
Box-building is rewarding, but nerve-wracking. As your work on a box progresses, the risks associated with errors increase sharply, and one mistake could mean scrapping the whole thing and starting over. Hinge installation is often the last step in the process, so many woodworkers are understandably anxious about it. The huge and bewildering number of hinge options can make just selecting a hinge a daunting task.
In this article, I'll describe in detail how to install one particular type of hinge: Highpoint side rail hinges. These hinges are economical, clean, and classy. They're made of solid brass and have built-in stops that hold the lid open at a 95-degree angle. They're only 5/16" wide, so they can be installed in thin-sided boxes. Best of all, they're relatively easy to install, greatly increasing your chances of producing boxes with smoothly closing, perfectly aligned lids.
If hinge-related anxiety has kept you away from box-building, put those fears aside, get a set of Highpoint side rail hinges, and continue reading. You'll be happy with your results.

Tools and supplies
To install these hinges, you need a router table, a 5/16” straight bit, and a small (#0) Phillips head screwdriver. Some paste wax is also handy, as it makes driving the screws easier.
You should also have some pieces of scrap wood handy with the same thickness as your box sides, for cutting test mortises.
Summary for experienced woodworkers
The general procedure for installing these side rail hinges is:- Install a 5/16” straight bit in your router table and set the bit height, fence, and stop block to rout a 5/16” wide, 1/8” deep, and 1 7/16” long slot mortise centered in the box side. The stop block should be to the left of the bit.
- Rout a test mortise in a scrap of stock with the same thickness as the box sides. Adjust the setup as needed.
- Rout the mortise in the box lid’s right side. Then repeat for the box’s left side.
- Without moving the router table’s fence, move the stop block to the right of the bit. Then, using climb cuts, rout the mortises in the lid’s left side and the box’s right side. Because you’re doing climb cuts, take extra care to hold the lid/box tight to the fence and table to make sure the bit doesn’t grab the stock and pull it too quickly or away from the fence.
- In preparation for routing the secondary clearance mortises, raise the bit an additional 1/16”. Rout the secondary mortises. No stop block is needed. Each secondary mortise is about 1/4” long, so you can stop routing as soon as the stock covers the bit. As long as you don’t get carried away, it doesn’t matter if these mortises are a hair long—the hinges hide them.
- Using the hinges as a guide, drill 5/64” diameter pilot holes for the screws. Just make sure they’re not too tight. The hinges include two extra screws, so you can test the fit without worrying about fouling the screw threads or heads.
- Wax the screw threads and install the screws.
- If necessary, make final adjustments to the hinges to make the box lid close fully, with the sides of the lid and box flush all around. If tightening the screws creates a gap at the front of the box, add shims made of tape, paper, or other thin material to compensate. (That’s why you don’t want the screws to fit too tightly in the pilot holes; you may need to remove and reinstall them.)
If that procedure isn’t clear, please continue reading. The rest of this article covers each step in detail, with photos.
Even if the procedure is clear, you may want to scroll to the bottom and read the section on an alternative method that doesn’t require the secondary mortises.

Setting up the router table for the mortises
After you install the router bit into your table, set the bit height to cut a 1/8” deep mortise. Instead of measuring, it’s easier to use the hinge itself as a guide. Note: if you err, it’s best to set the bit a hair low. If the mortise is slightly shallow, you can sneak up on the correct height when you cut a test mortise later.

Next, position the router table fence to center the mortise in the stock. Again, you can measure, but it may be easier to do it by eye.

If you want, you can cut a short test mortise now, or you can wait until you’ve set up a stop block for the mortise length. I did the former, and I was slightly off (hinge too far to the left).

I adjusted the fence and tried again. Now the slot is centered. After you dial in the fence’s position, you will not move it again. That ensures that the mortises in the box align (from side-to-side) with their counterparts in the lid.

With the bit height and fence set correctly, the last setup step is positioning a stop block to produce the desired mortise length (1 7/16”). I’ll get to this later, but you’ll need to rout two mortises, move the stop block to the opposite side of the bit, and rout the other two mortises. So you need an easy way to position the stop.
You can use calipers or a ruler to position the stop each time, but it’s far easier to cut a 1 1/8” wide spacer block. (1 1/8” for the spacer plus the 5/16” bit diameter equals 1 7/16”, the desired mortise length.)
Routing the primary mortises
As I mentioned earlier, you’ll cut the slots in pairs. To start, place the stop block on the left side of the bit, butt a stop block to it, and clamp the stop. The only tricky part here is rotating the bit so the cutting flutes are parallel to the fence. It’s okay if you don’t rotate the bit precisely, but pay close attention to the flutes so you can rotate the bit to the same angle when you move the stop to the other side later.

Now cut a test mortise in your scrap stock, and test fit one of the hinges. Slightly less than half of the hinge’s knuckle should sit in the mortise. I like the corner of the side (the end of the mortise) to just touch the hinge pin. If the entire pin is inside the mortise, the mortise is too long, and the lid won’t close properly (and you’ll have to chamfer the back edges of the box and lid to make it close, which may compromise the looks of your box).

If you’re happy with your test mortise, it’s time to rout the actual box. Take a deep breath and rout the mortise in the right side of the lid. Then rout the mortise in the left side of the box.
Next, move the spacer block to the right of the bit and clamp a stop block to the fence. Try to rotate the bit to the same angle as before. If the angle is different, your new mortises may have slightly different lengths than the first set. You want them to match as much as possible. (If they don’t, all is not lost, as you can still make slight adjustments when you actually install the hinges.)
Now you’re ready to rout the two remaining slots. This time, you’ll be moving the stock left-to-right over the bit. That’s called climb cutting, and it’s generally discouraged. Here, we’re making shallow cuts with a thin bit, so it’s okay. However, you do need to take extra care to hold the stock tight to the fence and the table, because the bit will tend to grab the wood and move it too quickly or away from the fence (which would be disastrous). Definitely make another test mortise to get a feel for it. Then rout the remaining two mortises.

Routing the secondary clearance mortises
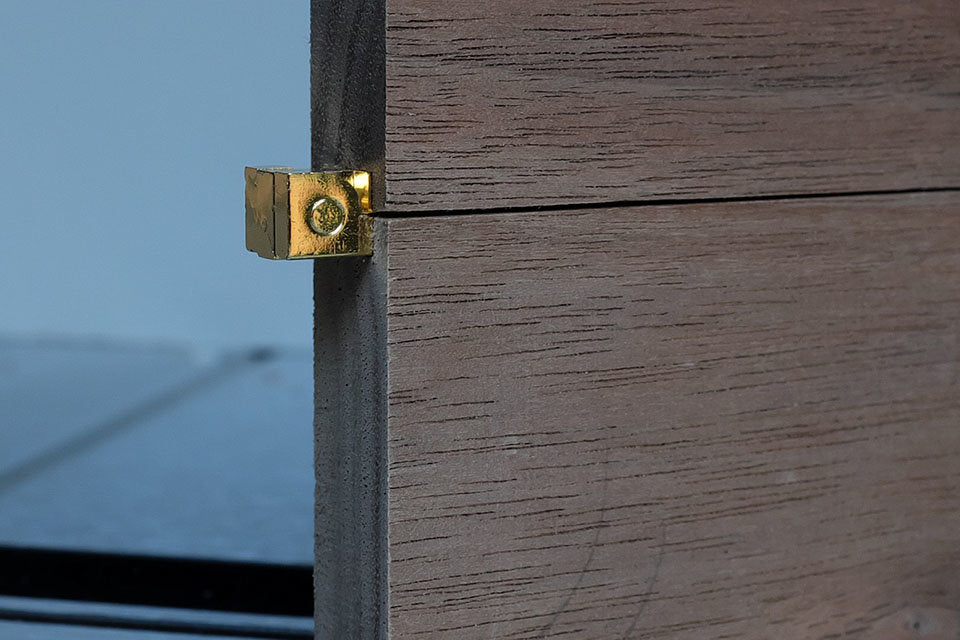
The hard part is over. Routing the secondary clearance mortises is much easier. Before we do that, let’s understand why they are necessary. Take one of your hinges and fit them to your box. It should look like this.

Beautiful, right? Well… yes, but if you screwed those hinges in place, your lid wouldn’t open. Why not? Take a look at this photo, where I moved the hinge back a bit and propped it open about 45 degrees. Notice how that middle “finger” extends down. If the hinge were fully forward, that finger would hit the bottom of the mortise.

Here’s another photo with the hinge flipped upside down. Notice how the two outer fingers would also hit the base of the mortise.

That’s why you need those secondary mortises—to provide clearance for the back edges of those fingers. Routing them is simple. Just raise your bit an additional 1/16” and rout the mortises. This time, you don’t even need any stop blocks. Just very slowly and carefully move the lid/box into the bit, and stop moving when the bit just disappears below the stock. These secondary mortises will be about 1/4” to 5/16” long. If they’re a hair too long, it’s no big deal, because the hinges cover them.
Your mortises should now look like this.

And now the fingers on the backs of the hinges don’t contact any wood as the hinges open.

When the lid is closed, the clearance gaps are visible. That doesn’t bother me, but it may bother you. If it does, and you’re willing to live with a wider gap between the lid and box (as seen from the front) when the box is open, you can rout shorter (1 5/16” long) primary slots, omit the secondary slots, and mount the hinges so their entire knuckles protrude from the rear of the box. I’ll talk more about this option in a separate section later.

If you think you’re going to build more boxes with side rail hinges, I suggest saving your spacer block and your best test mortise as a jig. That way, you can use the jig to set your bit height and fence spacing (provided that your new boxes use the same thickness for the sides as your jig). You could even use the jig instead of your spacer block to set up your stop blocks.
Installing the hinges
With the mortises cut, all that remains is installing the hinges (and applying finish to the box if you haven’t already done that). It’s pretty easy, but it can be a little fiddly, so don’t try to rush it.
You’ll need a 5/64” drill bit for the pilot screw holes. I tried a 1/16” bit, but the screws were too tight. With a 3/32” bit, the screws were far too loose. If you don’t have a 5/64” bit, I think a 1/16” bit would work if you reamed the hole out slightly. My hinges included two extra screws, so I could experiment without fear of fouling the threads or heads. I used some painter’s tape as a depth marker. (The last thing I wanted to do was drill a hole all the way through my lid.)

I started by drilling pilot holes in both sides of the box’s base.

Then I waxed the screws by poking them into a can of paste wax and removing the excess with a paper towel.

I used a #0 Phillips-head screwdriver (from a set of jeweler’s screwdrivers) to drive the screws.

With those screws in place, it’s time to work on the lid. Find a piece of scrap or a book to support the box’s rear side with the lid inverted on your bench. Hold each hinge in place with your hand and drill the pilot holes for the screws at the front ends of the hinges. Your drill’s chuck is too wide to let you drill the back pilot holes directly, so you’ll have to mark their locations with an awl, center punch, or drill bit (I just held the drill at an angle and drilled a divot as a mark.) Then move the base out of the way to drill the hole. Move the base back into position and drive the remaining screws.

If you’re lucky (or just that good), you’re finished. In my experience, tightening the screws sometimes caused the lid to lift just a hair at the front, creating a slight gap there. To fix that, I cut shims out of the hinge package’s plastic bag, placed them under one or both hinges, and repeated until I was happy with the fit. Any thin material (paper, sandpaper, tape, etc.) will work for the shims.
An alternative for routing the hinge mortises
The two-level mortises create a nice thin gap between the lid and box when the lid is open (when viewed from the front) and minimize how far the hinge knuckles jut out from the back of the box. They also result in visible gaps above and below each hinge when the box is closed. Obviously, these gaps are visible only from the rear. If they bother you, you can omit the secondary clearance mortises and shorten the slots to 1 5/16”, so each hinge’s knuckle extends fully outside the back of the box. That eliminates the gaps in the back completely, but exposes more of the knuckles when the lid is closed and creates a wider box/lid gap when the lid is open. I prefer the look with the secondary mortises, but the choice is yours.
Here’s what I mean by a wider box/lid gap. Just imagine you’re looking at a box with the hinge vertical, not just two scraps on their sides.

Here are views from the back and side.

If you look at the photo on the back of the hinge packaging, you can see that the hinge was installed using this short-mortise alternative. Notice the wide box/lid gap in the photo below. If you look very closely, you can also see that the entire hinge knuckle is behind the box, outside the mortises.


