
Overall dimensions: 32"w × 24"l × 76 1⁄4"h
Ask any woodworker struggling to carve a workshop from a basement or garage, and you’ll learn that the most valuable commodity isn’t tools or materials–it’s space. Often, the worst space-eaters aren’t the tools you’re using; they’re the ones you aren’t. By offering convenient parking spots for all sorts of portable and benchtop tools, this storage tower can help fix your power tool pileup.
This “closet on wheels” features hardwood face frames, a center divider to reinforce the open case, and adjustable sawtooth shelf hangers to make the most of available space. (The plywood sides can provide extra wall space for items such as clamp racks or tool boards.) And when you need even more space, the heavy-duty casters enable you to quickly roll a shop’s worth of tools out of the way.
I designed the cabinet to accommodate a wide assortment of benchtop tools and to minimize material costs. (You’ll need only two sheets of 3⁄4"-plywood and about 20 board feet of hardwood). And for those working without the benefit of a full-fledged workshop, I employed a few tricks so that they can build this tower with a few portable power tools and a small collection of clamps.
This cabinet takes up six square feet of floor space, but surprisingly, once it’s fully loaded, your shop may feel a little bigger.

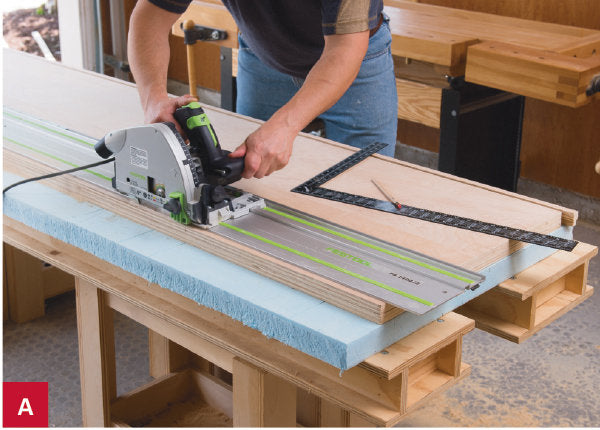
Set the cut depth so that the saw teeth graze the underlying foam. Stacking and sawing saves time and ensures symmetrical parts.

Use an offset guide to position the straightedge, and then rout both sides at once to ensure that the dadoes line up.

Use an offset guide to position the straightedge, and then rout both sides at once to ensure that the dadoes line up.

Build the case
- From one sheet of 3⁄4" plywood, cut the sides (A). From a second sheet, cut the top, bottom, and fixed shelves (B) to the sizes listed in the Cut List. (Note: Later, you’ll make the center divider (F) from the material left over from cutting the sides, and the adjustable shelves (I) from the shelf sheet.)Unless you have a tablesaw with a large infeed and outfeed table, the easiest way to break down sheet goods is by laying the plywood on a piece of rigid foam and using a rail-guided saw (Photo A). (Alternatively, you can use a standard circular saw with a shop-made or store-bought straightedge guide.) Cut one long edge, measure the cut on both ends, lay the guide rail in place, and then cut the opposite edge. Finally, cut the parts to length.
- Using a framing square, lay out the dadoes on one side (A), where shown in Figure 1. (Note: For tight-fitting dadoes, use a scrap piece of plywood to determine the actual cut width.)
- Chuck a 1⁄2" straight bit into a handheld router, and set the bit depth according to “Dado Depth Makes All The Difference,” bottom left. Now, clamp the sides (A) together, and use a straightedge guide to rout the dadoes across both sides, as shown in Photo B.
- Lay out and then rout the stopped grooves in the sides and the corresponding dadoes in the fixed shelf and bottom for the center divider (F).
- To limit the number of clamps needed to assemble the case, use a pocket-hole jig to drill holes along the ends of the top, bottom, and fixed shelf (B), where shown in Figure 1. (Note: Drill the pocket holes on the faces that won’t be visible after assembly.)
- Test-assemble the case without glue, to ensure that the parts fit and to obtain the exact dimension of the center divider (F). Cut the divider to fit. With help, apply glue to the dadoes, and then fit the top, bottom, and fixed shelf into one side (A) and clamp the parts together with 1"-long pocket-hole screws. Attach the opposite side in the same manner.
- While the glued-together case dries, mill the stock for the stiles (C), rails (D), and shelf edging (E) to the sizes in the Cut List, but make the stiles about 1⁄16" oversized in width. Also, leave the shelf edging long for now.
- Using a pocket-hole jig, drill holes at the ends of the rails (D). Position the stiles (C) on top of the assembled case to double-check the position of the rails, and then assemble the face frames using 11⁄4" pocket screws and glue.
- Again using a pocket-hole jig, drill holes along the inside edges of the sides (A), the bottom-face edges of the bottom and fixed shelf, and the top-face edges of the top (C), as shown in Photo C.

10. Square the assembled plywood case, apply glue to the outside edges, position the face frame on top, and then attach the frame with 1 1⁄4" pocket screws (Photo D). Repeat with the opposite face frame.
11. With the cabinet lying face frame up, use a handheld router and flush-trim V-groove bit to trim the outside edges of the stiles. (Note: You may also use a standard flush bit. I use a V-groove flush-trim bit for concealing less-than-perfect joints.)
Attach the casters and shelves
- From 3⁄4" hardwood, saw spacers (G) and caster mounting boards (H) to the sizes listed in the Cut List. Using the caster bracket as a guide, lay out mounting holes. At the drill press, drill clearance holes in the caster mounting board (H) for the attachment screws and pilot holes for the lag screws.
- Attach the spacers and mounting boards to the case bottom with glue and 1 5⁄8" screws. Finally, attach the casters with washers and 5⁄16 × 1" lag screws.
- Sand the case interior to 220 grit, and apply your desired finish. (I used two coats of General Finishes Enduro-Var.) Now attach the sawtooth brackets to the inside of the case with 3⁄4" brads. Then, cut the support strips (included with the brackets) to fit.
- Make the adjustable shelves (I) about 3⁄16" shorter than the interior dimension so that they can be installed and readjusted.
- Lay out 1⁄2 × 1⁄4" notches on the plywood corners, where shown on Figure 1. Cut the notches with a fine-tooth handsaw.
- Trim the shelf edging (E) to match the notch-to-notch distance on the plywood. Glue the edging to the plywood shelf. (The shelves should fit snugly. Fit them in at the top and slide them between the sawtooth brackets.)
Finish up
- Sand exposed surfaces through 220 grit, and then apply your desired finish.
- Insert the adjustable shelves into the case, load up your tower, and you’re ready to roll.


