
Imperfections provide the perfect opportunity to create unique vessels
My specialty is turned wood bowls and vases made from highly figured, visually interesting wood. I’ve come to enjoy the challenges presented by blanks with unusual characteristics–bark inclusions, burl, spalting, quilting, voids, birds-eye and other figured grain conditions. The tips explained here are especially important for turning the “tricky” wood described above. But you’ll also find some of them helpful for many other types of turning projects.
1. Source wood creatively & carefully.
Finding figured turning blanks is challenging, especially when you live in a big city like I do. I’ve purchased many blanks from a handful of trusted sellers on eBay. When I can’t physically examine the wood, I have to rely on images supplied by the seller along with a detailed description. So I insist on good photos and accurate details with regard to species, dimensions, moisture content, density and notable characteristics. It helps greatly when the seller has roughed out the blank so I can see more of the grain. I prefer air-dried or kiln-dried wood over green wood because dry wood is more stable. Also, dry stock can be turned from start to finish, without the intermediate drying that green wood requires.

2. Catalog & protect your blanks.
If I’m not planning on turning a blank right away, I label it to keep track of basic information–species, size, seller’s name, purchase date, cost, and (in some cases) a client or craft show destination for the finished object. It’s important to avoid moisture and temperature extremes when storing wood. The workshop I share in Brooklyn is fairly good in this regard. Green blanks, which I sometimes get from local sources (tree services and the Brooklyn Botanical Garden) demand special treatment to avoid checks and cracks as the wood dries out. I saturate green wood with Anchorseal to slow down the drying process, thus minimizing cracks and splits.
3. Allow unusual features to inspire the design.
When ready to turn, I inspect the blank again for figuring, unusual markings, color or texture changes or features requiring extra consideration. Now is the time to decide whether to accentuate or eliminate. For example, a piece of embedded bark could either be stabilized with adhesive or eliminated by keeping it out of the planned turning. A few of my finished pieces are shown below to illustrate how unusual characteristics can be incorporated into a design.
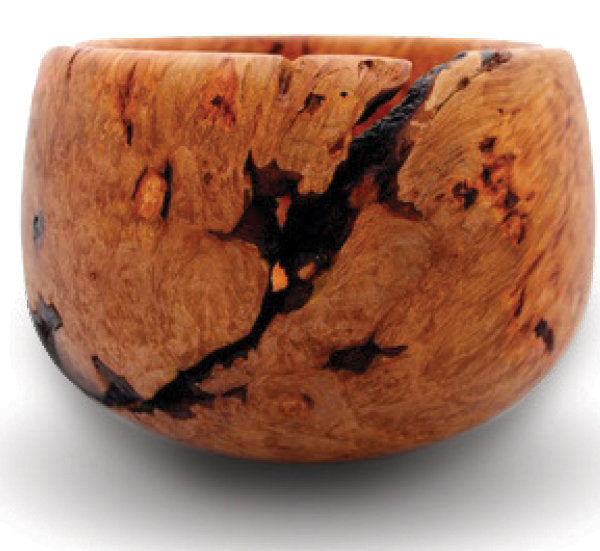
Big leaf maple burl bowl, highly figured, with bark inclusions (10 × 7").

Spalted and quilted sugar maple bowl with bark inclusions (131⁄2 × 3").

Yew wood vase with large bark inclusions and knots (4 × 9").

4. Work safe.
I switched from safety goggles to a full face shield after a chunk of spalted maple sent me to the hospital for several stitches above my lip. When I began to turn yew blanks, I invested in a NIOSH-approved, double-cartridge respirator as protection against toxic wood dust. I use the respirator whenever I’m turning certain wood species and always when I’m sanding any type of wood. It definitely provides more protection than disposable dust masks. I often wear fingerless weightlifter gloves because the padded palms provide cushioning. Having my fingers exposed still gives me plenty of feel when turning or sanding.
5. Have a good selection of “go-to” tools.
Since there’s no such thing as a “typical” tricky blank, my tool selection depends on blank characteristics and the desired design. I’ve come to rely on the gouges, scrapers, and parting tools shown above. If the blank is fairly cylindrical to start, I’m likely to true it up using 1⁄2" bowl gouge with a swept-back grind. With odd-shaped blanks I use a parting tool to create relief cuts followed by cleanup with a roughing gouge or bowl gouge. My square end scraper does a good job of lightly cleaning up a bowl’s exterior profile.
When hollowing the inside of the vessel I start with a diamond parting tool to a depth of approximately 1⁄2" to create the initial interior wall. Using this as a guide, I begin hollowing using a 1⁄2" or 3⁄4" bowl gouge with conventional grind, taking scooping cuts. I clean up the interior with a variety of scrapers to blend and smooth the curved surfaces and flat bottom of the vessel. My favorites are a 3⁄4" round/side cut scraper and a 1⁄2" roundnose scraper.


6. Watch your speed & feed pressure.
I’ll set speed as low as 300 RPM for imbalanced blanks, but spin to over 1,500 RPM for final true-up. I take care to present the tool to the wood carefully, avoiding aggressive feed pressure until I’m in an area where wood grain and density are consistent. It’s important to know where the voids and variations are located in your blank. Areas with bark inclusions and density variations can throw off chunks. I try to minimize this by dropping RPMs when turning a vulnerable section.

7. Stop more frequently.
Turning tricky wood is the opposite of production lathe work. Every piece is unique, and I get the best results when I don’t rush. It’s important to stop the lathe frequently to examine the blank and see how it’s reacting to the tooling or sanding. With the work stationary, I also see if new figuring or unusual characteristics have been revealed. This is an important rule for beginners as well as seasoned turners.

8. Stay sharp.
Sharp tools are essential with any kind of turning, and with tricky wood I find myself spending even more time at the grinder. A sharp cutting edge will help keep a bark inclusion intact and enable me to shape the workpiece with more control and less feed pressure. I make sure my grinder has been dressed with a diamond wheel dresser to ensure a flat surface before setting the tool bed to suit the proper bevel angle for the desired cut. I use a variety of bevel angles for my tools. I like the crispness of a swept-back grind on my gouges for exterior shaping of highly figured wood but use a more blunted traditional bevel for hollowing.

9. Improve patching and finishing skills.
I prefer not to patch or fill, but I sometimes need to stabilize portions of a blank. I stabilize minor cracks or inclusions by applying liquid cyanoacrylate directly to the defect. For larger cracks or bark inclusions that contain voids, I mix gel cyanoacrylate and sawdust to create a fast-drying filler. It often helps to blow adhesive into cracks with an air compressor.
My standard finish involves two steps. First I apply a thin coat of Watco Butcher Block Oil, wipe off the excess, and leave the piece to dry. After lightly buffing all surfaces with super-fine (0000) steel wool and wiping off any loose metal particles, I apply Boos Block Board Cream. This butcher block finish has the consistency of petroleum jelly, but I prefer applying it in liquid form after heating it. An important note: Prevent the Boos finish from caking up in bark inclusions by first saturating these with mineral oil.
10. Learn from your mistakes.
My home is full of turned vessels that provided various lessons in what not to do. These pieces are still unique and beautiful; they just aren’t good enough for me to sign and sell. Don’t be discouraged if a tricky woodturning project doesn’t come out as you had planned. It takes practice and at least a few mistakes to get a feel for this kind of turning.


