
Use these simple turning techniques to create a unique lidded box.
The unusual thing about this particular box is that it’s turned from a hybrid blank. Resin casting, a means of molding acrylic material into blanks for turning, has become very popular in recent years and hybrid blanks are a big part of the trend. “Hybrid” is a term coined for combining wood and resin together to create beautiful and unique designs. You can buy hybrid blanks or make them yourself, see onlineEXTRAS.
When turning a hybrid blank, you’re working with two different materials at the same time, each with its own unique properties. Due to its hard, dense nature, resin is prone to chipping while turning with gouges or typical scrapers. But the new Easy Wood Tools Negative Rake Carbide Cutters are a game-changer for turning tough material. The angle of the negative rake virtually eliminates chipping, leaving behind a smooth surface. For more information on negative rake cutters, see the box at right.
Turned lidded boxes are quick and easy to make. The shape of your box is limited only by your creativity. But I’ll show you the basic process that you can apply to your own box. You’ll be churning out these boxes in no time and handing them out as gifts.

New negative rake cutters
Easy Wood Tools introduces new carbide cutters designed to reduce catching and chipping on man-made materials like resin and acrylics. They also work well with very dense hardwoods. But best of all, you don’t need to buy a whole new tool. The new cutters are designed to replace similarly shaped standard cutters on existing EWT tools. Check out EasyWoodTools.com for more information.
Turn tenons and part away the body.
True your blank and turn a dovetailed tenon on the lid end as shown. Remove the blank from centers and mount it in your 4-jaw chuck using the tenon you made.
Bring up the tail stock for support and turn a tenon on the box end. Then part off the lid. If you are turning resin for the first time, beware. Resin is very hard and doesn’t create dust or small chips like wood. The waste shoots out like a confetti canon as you turn. As always when turning, wear a face shield.
Due to its dense nature, resin is more brittle than wood, so leave extra material for handsawing here. Set aside the box body, leaving the lid in the chuck to turn the interior.

Turn a cylinder. To start, place a 31⁄2"-dia × 7"-long blank so what will be the box’s lid is on the tail stock end, and turn it to a smooth cylinder. Set your lathe at 2000 RPM and true the blank using the mid-size 1⁄2" Easy Rougher equipped with a Negative Rake Cutter.

Create a dovetailed tenon. Using the Easy Rougher, turn a tenon at the lid end. With the Easy Detailer, add a taper to the tenon creating a dovetail that will fit securely in your 4-jaw chuck. Square up the shoulder.

Off with its lid. Part off about a third of the blank for the lid, using a 1⁄4" parting tool. Again, take precautions with the resin. Its brittle structure could break if you part away too much. Turn off the lathe, and then use a handsaw to finish the cut. Remove the box body.
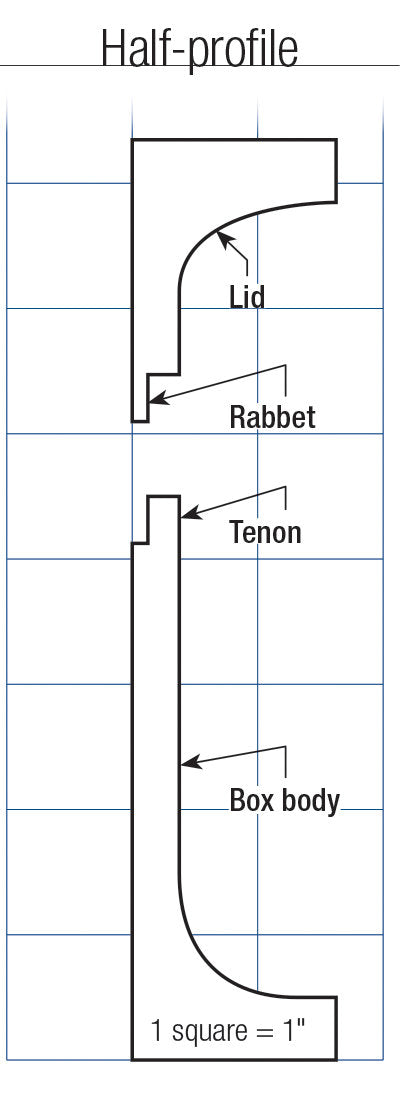
Turn the lid interior and make a rabbet.
True the end of the lid, shape its interior using the Hollower, and then make a rabbet as shown.
Measure the depth of the interior, and make a parting cut to establish the top end of the lid. Then sand and finish the lid interior. Wet-sanding through the grits greatly reduces dust. Take care not to over-sand the rabbet shoulder, as you’ll want a nice square lip that fits tightly over the tenon you’ll cut on the box body. Now saw the lid free at the parting cut you made earlier.


Fit the lid to the body, and then finish the lid.
A well-made box has a snug-fitting lid. Start by mounting the box body in the 4-jaw chuck using the second tenon you made. The third tenon you’ll turn will fit the rabbet in the lid. I spin the body at 2000 RPM, and do most of the shaping with my square cutter. A parting tool will help you get into the tenon corner. This tenon serves as a sort of jam chuck to hold the lid in place for its final shaping, so aim for a snug fit. Mount the lid on the body and turn both to the same diameter.
Use the same sequence of sanding and polishing to finish the outside of the lid.

Test your tenon. When turning the box tenon, take care to creep up on a snug fit by stopping the lathe frequently, testing the fit, and then turning a little more. Keep turning and testing until the lid fits snugly. A tight fit is key for the next steps.


Sand and polish. Use the same sanding and polishing sequence you used for the lid interior to finish its exterior.
Hollow and finish the box.
With the lid set aside, start hollowing the box interior using a Forstner bit. Remove the rest of the interior of the box and then sand and finish the inside as before.
Flip the body around and mount it to a waste block. Complete the shape of the box body and sand and finish the exterior. I used Howard Feed-N-Wax.

A boring way to save time. To quickly hollow out the box, drill it out using a 21⁄8" Forstner bit. Chuck the bit in your Jacob’s chuck and turn your lathe speed to 200 RPM. Advance and retract the tail stock as needed until you reach the full depth, about a 1⁄2" from the bottom.


Remove the nub. Without removing the tail stock, use the Detailer to turn away as much material as possible. Finally, remove the tail stock and slice off the remaining nub with a knife. A little bit of hand sanding and then you’re done.


