
More colors, better control, and lower cost make dyes a popular choice.
The mere thought of “staining” strikes fear in most woodworkers’ hearts, and for good reason. At one time (perhaps more than once) we’ve all watched a project suffer the blotching, streaking, or muddiness that comes from a can. After a few disasters, many decide to stick with clear finishes. “Going natural” might eliminate the risk of ruin, but it also means giving up the color control or unique look you were originally after.
Here, you’ll learn how to use dyes as a stain, tint, and toner, much like the color control knob on your television. Put these skills to work to add more color to your next project, or enhance the color you already have.

The deal on dyes
Dyes differ from the water- and oil-based pigmented stains found at hardware stores and home centers. Technically, dyes are part of the stain family, but they add color in a way that sets them apart. Pigmented stains rely on particles that lodge in grain lines and pores and “sit” on the wood; in some cases this accentuates scratches, gouges and other defects you were hoping to hide. Dyes dissolve completely, saturating wood fibers for a more even appearance, while simultaneously revealing hidden figure.
Available in a wide range of colors—from subtle wood tones to brilliant primaries—dyes inject color without obscuring the grain. This means you can apply additional coats of the same color to enrich or darken it, apply a different color to vary a hue, or go completely black, as shown in Photo A, without creating the built-up look of a watered-down paint.
Concentration Controls Color

Water-soluble dyes can deliver more or less color simple by adjusting the colorant to solvent ratio. You can apply multiple light coats to sneak up on a darker tone. If you go too far, lift color with a clean damp rag. Note how the color and grain pop after a clear topcoat.

Staining lets the color sink in
Dye powders divide into water-, oil-, and alcohol-based powders. Of these, water-soluble powders work best as an all-purpose palette starter. They are slower and safer to work with, and less expensive than liquid concentrates. And when kept in a dry, dark location, the powders have an almost infinite shelf life.
Once dissolved, water-soluble dyes can be applied with a brush, rag, spray gun, or even a plant mister. And because water evaporates more slowly than other solvents, you have time to blend or wipe off excess stain with a rag. The only disadvantage to water is that it raises the grain. To pre-empt this, wipe or lightly mist the surface with distilled water before you stain. When the piece has dried, knock off the whiskers by lightly sanding with 220- or 320-grit paper.
With dyes, color intensity directly correlates with concentration. This control game starts when you mix up your first batch. Take the “1 ounce powder to 1 quart” mixing instructions with a grain of salt. Most projects won’t require so much stain. Use a kitchen scale or dry measuring spoons to mix up a smaller amount. When testing colors, try starting with a half-strength mix.

Adding color is easier than removing it. For more color, you can always add more powder to your mix, or wipe a few extra coats on your project. Add the powder to hot water (the heat helps the dye dissolve), then strain the mix through a filter to catch undissolved chunks that might spot your work.
One of the thrills of applying dye is the immediate gratification. Dyes look great when wet, but get dull and muddy as they dry. Not to worry, the color will return as soon as you add a clear topcoat (Photo B). From here, you can apply additional coats of the same color to deepen the color, or wipe on a different dye to adjust the hue. If you go too far, you can lighten the color by lifting some of the dye with clean damp rag.
When done, seal the color under any film finish. Note that brushing on a waterborne finish can reactivate dye and then lift and shift the color. To avoid problems, apply a light sealer coat of clear shellac.
One-Step vs. Two-Step Finish
Adding dye to oil is a fast and easy way to pop figure without raising the grain, but it does not change the color as dramatically, nor as controllably, as a two-step finishing sequence.
Tinting adds color without grain-raising
Adding dye to your favorite oil finish combines coloring and finishing into a single step. To do this, you’ll need liquid dye concentrate or oil-based dye powder. To make your custom color, simply combine the oil and dye. (Dissolve the powder first in mineral spirits to prevent clumps. With liquid, simply add a few drops.)
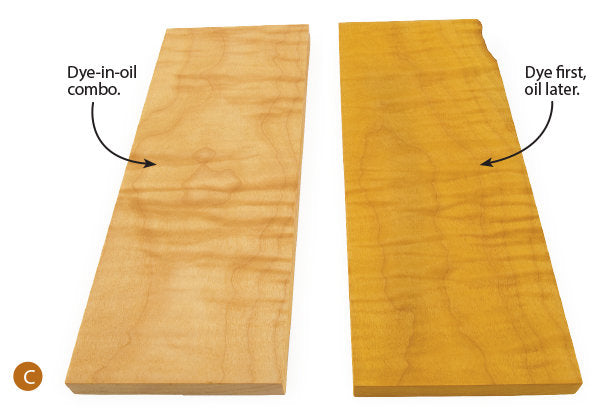
Like water, oil penetrates into the wood, enabling the dye to accentuate figure, but without raising the grain. The drawback? That gain in convenience comes with some loss of color and control. As shown in Photo C, you get more color from the two-step finish. It’s also more difficult to undo or adjust color once the oil cures.

Toning controls color on top
Sometimes color inconsistencies don’t appear until after the damage is done. Adding dye to any clear film finish turns it into a toner that can be used to add color without affecting clarity. Use this mix to unify the color of a few mismatched boards or adjust the hue of the entire piece. (Note that toning diminishes the highly contrasted “pop” of figured stock.)
Premade toners are available in lacquer-based aerosols, but if mixing your own, try starting off with clear shellac. Shellac dries quickly though slightly slower than lacquer, making it a little easier to apply with a rag or brush. And in case you add too much color, you can undo your work with denatured alcohol.
To make a custom toner, simply add dye to your shellac a few drops at a time. To see how your toner looks as a thin film, test it on a paper plate or piece of glass (Photo D). Lighter is better; adding an extra coat to sneak up on the exact color is easier than removing it if you go too dark. Whatever you do, document it for duplication later.
Toner can be used for spot repairs, but for best results, apply a light coat of finish to the entire surface, then focus your attention on the trouble spots. After you’ve evened out the color, seal the surface with a clear topcoat for extra protection.

Spreading a thin layer of finish on a piece of glass is a good way to determine how it will look on the wood.
Adding a few drops of dye to a clear finish can help blend sapwood in with the rest of the board.


