
Spice Box History
Spice boxes were considered a luxury piece, typically observed in parlors of affluent homes. These dovetailed casework items, were made from walnut, curly maple, cherry or mahogany exteriors. While tulip poplar or oak were used for concealed areas, inlay patterns were made from red cedar and locust. Originally utilized to store high commodity spices, spice boxes became prevalent in England during the early seventeenth and mid-eighteenth centuries.
As spices were imported into the ports of Philadelphia on English ships, spice boxes became popular in the Colonies during the William and Mary furniture style period from 1690-1730, and overlapped the Queen Anne period from 1720-1765, then into the Chippendale time frame of 1755-1790. It is also noted in the The Pennsylvania Spice Box-Paneled Doors and Secret Drawers book by Lee Ellen Griffith, that the oldest box boxes were not only to keep cooking spices, but also for spices converted to usable scents, fragrances and medicinal items.
Through the Delaware Valley to Chester County, Pennsylvania became a maker's haven due to plentiful walnut wood for cabinetmakers spice box creativity, and thus the Pennsylvania Spice Box was named. As the value of spices declined in price due to widespread availability, spice boxes became useful to retain jewelry, spectacles, buckles, buttons, lace, combs, and other valuables.
Craftsman often added their artisan aesthetic designs and hidden compartments to spice boxes to showcase selling features for lowboy, highboy, and secretary handcrafted furniture. It was much easier to travel and show these smaller boxes for larger commissioned pieces as different designs were a collaboration between the craftsman and the client.

About the Craftsman
Kyle's handcrafting interest was homespun from his father, Robert Meyer, teaching Kyle how to use tools and doing home maintenance.
His woodworking journey started in the 9th grade wood shop industrial arts class at Whitmer High School in Toledo Ohio with "Three great seasoned shop instructors", Kyle stated. With only one credit left to attain his senior year, he knew what he wanted to do and spent every minute he could that year developing his woodworking skills in that high school shop.

After high school, Kyle continued his woodworking education at the University of Rio Grande obtaining a two-year degree. Entering the working world from 2003-2008, Kyle added Letort Fine Furniture Cabinet Maker, 84 Lumber pre-fab and wall panel designer, 84 Pennsylvania Corporation roof and floor truss designer, to his resume. The housing crash ensued, but that didn't stop Kyle from woodworking. Over the next two years Kyle built display bookcases in his Uncle's shop fine tuning his woodworking capabilities.
Woodcraft hired Kyle into the tech department in 2010, where he assisted customers through emails and phone calls. He also inspected product for quality and testing through 2018. Kyle then earned a Product Manager promotion, where he searches for and brings aboard new product lines to help all of our woodworking family out there, make wood work!
Kyle enjoys woodworking for fun and for the design element process, trying different things like hand-cut dovetails to refine and increase his skill set. Kyle commented, "I create for myself." In fact, as I interviewed him, we laughed about the consideration of his shop name to be, "The Wood Shop of Me!" Being quite the talented self-admitted perfectionist, Kyle said, "I am hard on myself. I make things that are not perfect, striving for that perfect joint and finish. That is why I'll create for myself and make things for others, just not commissioned work!"
The Design Plan

Kyle used this 18th century inspired antique spice box design plan to create his own rendition from the May/June 1997, Issue No. 124 of Taunton's Fine Woodworking Magazine.
Note: This is an advanced skill level plan & build. We recommend that a first-time builder be familiar with dovetail joinery as well as frame and panel construction.


The Project Layout
Kyle uses SketchUp to simulate his builds. Kyle said, "I have found on occasion that plan layouts can be in error and SketchUp helps to check the dimensions before making my cuts. This assures minimal risk in my wood use, especially when I have a limited supply of wood choice for my particular project." He added, "If you're stuck on a joint or particular area, sketch it out first for a "virtual woodworking" check & balance."
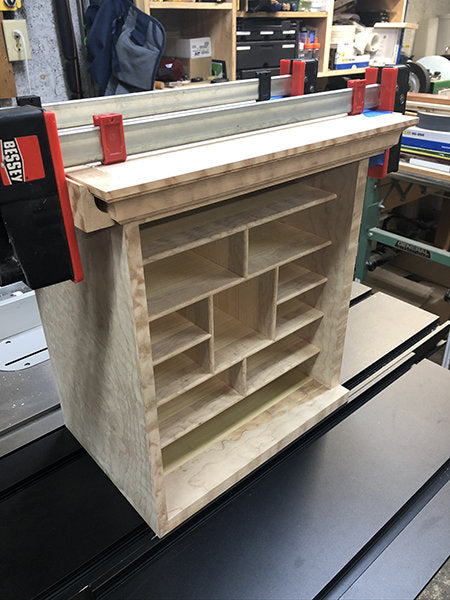
The Four Sided Case & Drawer Dividers
Kyle handcrafted this spice box after work and on weekends for about 2-1/2 months. He used Quilted Maple for the case top, sides, door, bottom and drawer divider front edges. The four sides of the case were joined with hand-cut through dovetails. The crown molding is shaped on the router table, then mitered to fit around the top of the sides and front of the case. Cut-offs from the moulding are turned upside down to use as cauls for clamping while gluing the molding in place (see last photo below).
The drawer divider grooves were cut into the quilted maple case with a compact router and plywood edge guide using a 1/4" spiral straight bit. The drawer dividers consist of a 1” strip of quilted maple primary wood glued to secondary soft maple wood. Grooves in the horizontal dividers are milled with the same 1/4" straight bit but stop 3/4" short of the front edge. The groove is then extended to the front edge with a “V” bit. Ends of mating vertical dividers are also treated with a chamfer on both faces toward the front edge to mate with the “V” groove. The quilted maple front edge is then bull nosed.
If the front edge of all the dividers are left square, the “V” groove detail is not necessary. The 1/4" groove would run completely from front to back.


What's that? Ah - Dovetails? Don't talk about - Dovetails? You kidding me? Dovetails?
If you have never cut a straight line, now's your chance. Eleven drawers in this challenging game of hand skills await your wits to win, with hand cut through dovetails in the back and half blind dovetails in the front of each drawer. Kyle created the jig (below) to hold all the drawer parts in an elevated position. It also serves as a support for the router while hogging out the waste in between the pins on the drawer fronts. Good luck, perfect practice makes perfect....dovetails!


The Drawers
The drawer fronts have book-matched Walnut Burl Veneer. Titebond Cold Press Veneer Glue was used to apply the veneer onto the soft maple fronts, which were placed on a substrate with cut grooves to allow for a better vacuum seal using a Vac U Clamp Vinyl Bag. A 3/8" thick back is made up of three tongue and groove soft maple boards fastened with traditional cut nails.


More Dovetails... Foot Assembly Moulding
Before using the quilted maple to build the full blind mitered dovetail foot assembly joints, Kyle made pinewood practice templates, as this was a first-time experiment.


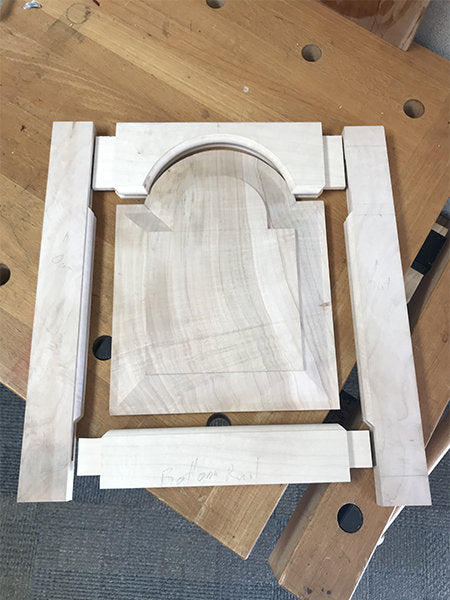
The Door Construction
The door is mortise and tenon joinery with a mitered bead and raised tombstone panel. Kyle had not made this type of door since his earlier college days and so a practice door was made from less expensive soft maple. The panel is “raised” on the router table with a raised panel bit. The inside corners at the top of the panel then need to be hand carved to complete the profile. Kyle shows us how to chisel the mitered bead using a 45 degree angle guide block for a perfect fit.


The Finish
Kyle sanded the raw wood to 220 and used Waterlox Universal Tung Oil Sealer H20LOX, which accentuated the grain pattern.
Having great experience in the past with General Finishes HP Poly Top Coat, Kyle followed up with 4 coats of semi-gloss. In between the first three top coats, the entire box was sanded with Norton 320 Wet Dry Sanding Sheets. After the fourth coat, he sanded with the respective grits of Mirka's Mirlon Nonwoven Total Scuff Sanding Pads. For a final protective touch, he applied Liberon Black Bison Wax, letting it dry and buffing it out.

I typically find with every interview, woodworkers have an eye for detail. Even Kyle's assistant, Walt seems to appreciate the quilted maple project at hand! Woodworkers are always the first to point out their mistakes, learning from them and how they intend to use that information with future projects. That makes every craftsman unique in their own right, growing their talent, one step at a time.
Kyle is about all of that, as well as sharing his woodworking knowledge, not only in his shop, but also in his product manager position here at Woodcraft Supply, LLC.
Kyle stated, "The look of a beautiful piece of wood can be intimidating, don't be afraid of making mistakes in creating something extraordinary.... because its just wood!"

Find your woodworking passion by building a Spice Box. Perhaps even add a hidden compartment or two! Who knows, perhaps one that you make, will become a historical artifact for future generations to enjoy.
For additional Spice Box build information, check out Woodcraft Magazine's Feb/Mar 2017 Issue 75 for "Build A Classic Spice Box Part 1" and the Apr/May 2017 Issue 76 for Part 2.
We are always here to help you make wood work, so....
Get to Woodcraft, Get Inspired and Get Woodworking,
Frank


