
Cut perfect pairs that add up to square.
Overall dimensions: 28"w × 23 1⁄2"d × 5"h
If you have ever tried cutting miters on the tablesaw using a stock miter gauge, you know how dicey it can be to get accurate 45° cuts. And if a cut is off by even a degree, the error doubles when the mitered piece is paired with its mate, creating a “square” corner that is anything but. Miters cut this way often have to be trued afterward, typically using a hand plane and shooting board.
Fortunately, there’s an easier way: using this dedicated miter sled. The jig is foolproof due to its two fixed fences which are set squarely to each other and at 45° to the blade. Just position the mating workpieces against the adjacent fences in their assembled relationship for perfect 90° frame miter joints every time. The rails at the front and rear edges keep the sled panel flat, which is important to prevent twisted frames. I used 9-ply 1⁄2"-thick hardwood plywood for its stability.
If you’re willing to invest an hour or two building this sled, the time will be paid back in spades with no-fuss miter cuts that are ready to go right off the saw.

Using The Sled
This sled allows you to miter the ends of frame pieces as wide as 6". The beauty of the design is that as long as the fences are mounted at precisely 90° to each other, your miters will be perfect every time, even if the fences don’t meet the blade at exactly 45°. Beginning with workpieces squarely cut to final length, orient them on the sled in their final assembly orientation, and then saw the miters.


Make the parts
1 Cut the parts as shown in Figure 1, dressing everything straight, flat, and square. The runners should slide easily in your saw’s miter gauge slots, but with no side-to-side play. Make them 1⁄16" thinner than the slot depth so they won’t drag on the bottom. To reduce weight, shape the rear rail, rounding its top edges for comfort.
2 Miter the ends of each fence at 45°, and then cut a 1⁄16 × 1⁄16" chip-clearance rabbet into the bottom edge of each face.
3 From solid stock, saw the guard block absolutely square to ensure that the fences will attach to it at exactly 90°.
Tip Alert
Fit the runners
1 Place the runners in their slots, shimming them flush to the tabletop. Mark for the saw kerf at the center of the panel. With your rip fence against the panel, align the cutline with the blade teeth, and lock the fence in place to register the panel’s location.
2 Mark the runner centerlines from rear to front across the panel, and then drive a few small nails through the panel into the runners, leaving the heads proud for easy removal later (Photo A).
3 Overturn the panel, and attach the runners with countersunk flathead screws (Photo B). Then remove the nails.
4 Test-fit the runners in their slots, trimming their edges with a shoulder plane, cabinet scraper, or sandpaper as necessary until the sled slides easily without wobble.

Attach the guard block, fences, and rails
1 Clamp the fences to the guard block on a flat surface and drill and countersink for #6 × 1 5⁄8" screws, avoiding the blade path (Photo C). Then glue and screw the parts together.
2 Lay the fence/block assembly in place on the sled, and mark where its nose intersects the sled’s center line. Then saw the panel to that point (Photo D).
3 With the saw unplugged, raise the blade to full height and place a 45° triangle against the blade body. Extend an accurate straightedge from the triangle to your layout line, and continue the line outward (Photo E).
4 Align the fence assembly to the extended lines with the nose centered on the panel kerf, and clamp the assembly in place (Photo F).
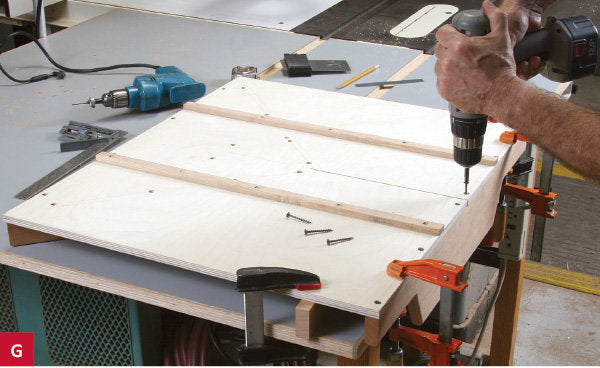
5 Overturn the sled and attach the fence/block assembly with countersunk #6 × 1 5⁄8" flathead screws, avoiding the blade path. Also fit the front rail, and screw it and the rear rail to the panel (Photo G).
6 With the blade raised a couple inches, saw through the rear rail and into only the front ends of the fence. (It’s okay if the blade doesn’t perfectly bisect the center of the fence miter.) Finish up by applying fine sandpaper to the fence faces to prevent workpiece slippage. Make sure to keep it above the chip clearance rabbet. I used spray adhesive, after masking off the surrounding areas.
About Our Author
Senior editor Paul Anthony is the author of Taunton’s Complete Illustrated Guide to Tablesaws.


