
4 ways to break sheet goods down to size
Even if you own a full-sized tablesaw, cutting a 4 × 8' sheet of plywood, melamine, or MDF into manageable-sized pieces can be a real challenge. Sliding tablesaws or industrial panel saws provide good solutions, but they amount to expensive space-hogs for the small-shop woodworker who just needs to make a few cuts now and then. Fortunately, you can achieve straight, accurate cuts by partnering your existing portable circular saw with your choice of a commercial guide made for the job. Why not just use a straight board for a guide, you ask? Well, a closer look at commercial guides reveals that they’re designed for the kind of saw or router teamwork that you just can’t expect from a simple wooden straightedge. Here, you’ll find a rundown of four popular types of commercial guides. I’ve included price, cutting capacity, and a few other details you’ll want to consider before making your final decision.
Note: For our purposes here, “crosscutting” refers to sawing across the direction of plywood’s face grain, or the narrow dimension of a sheet. “Ripping” is sawing with the grain, or parallel to a sheet’s longer dimension.

Trimming parts to size on the tablesaw with a premium blade produces the cleanest edges. However, a portable circular saw outfitted with the right blade can come close. For smooth cuts with minimal splintering or tear-out, select a Hi-ATB carbide tooth blade. (I recommend the 7 1⁄4", 60-tooth Freud LU79 [#844954, $49.99.]) This thin-kerf blade comes in handy when I’m trying to squeeze one more piece from a sheet. To keep the blade cutting as it should, reserve its use for sheet goods only.
Crosscutting Guides
Depending on your parts layout, the first move in breaking down a full-sized sheet may involve crosscutting it–a particularly dicey maneuver on a standard tablesaw. This is where a crosscut guide saves the day. Guides are available in a variety of lengths, but make sure you get one that can grip a 48"- wide panel. Although shorter guides cost less, the savings won’t count for much when it’s time to crosscut a full sheet of plywood.

All-In-One Guide
By incorporating cam-lever clamps into a length of aluminum extrusion, WoodRiver turned an otherwise simple straightedge into a standalone sawing solution. To use the tool, position it, slide the moveable jaw against the workpiece, and flip the toggle clamp locking lever. The lowprofile lever locks well enough in horizontal position to secure the clamp even when you’re working on the floor. Levering it down further provides even more locking pressure. Keep in mind that a guide like this is not self-squaring, so when making a cut perpendicular to the edge of the sheet, you’ll need to set the guide using a square. You’ll also need to offset it from the cutline by an amount equal to the distance between the saw’s blade and baseplate edge. You can measure for each cut, but it’s much faster to use spacers, as shown in the photo above. Optional connecting saw or router subbases are available to prevent a tool from straying, but you don’t need them as long as you keep the machine pressed against the guide in use.
Protractor Guide
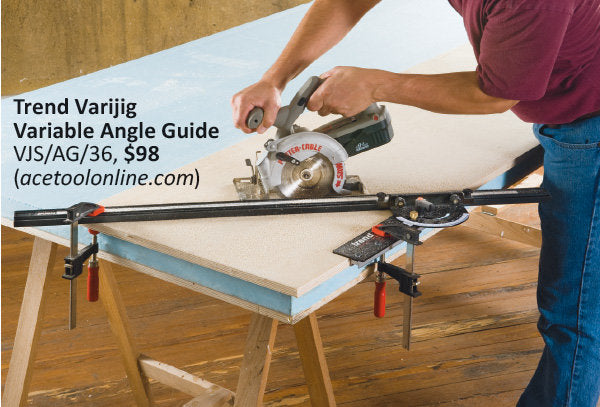
With its adjustable protractor head and bar, Trend’s Varijig Variable Angle Guide offers a surprisingly accurate means of making wide-angled cuts, which can be difficult or impossible to make on a stationary saw. After calibrating the head, I was able to accurately set the angle of the bar to within a half-degree across its length. The guide can be used freehand when crosscutting narrow pieces, but you’ll want to use clamps to avoid slippage on longer cuts. And, as with the All-in-One clamp guide, you’ll want to make a pair of offset spacers for quick setup of the cut. The only disadvantage I found was that the 36"-long bar doesn’t span a full-sized sheet. The guide can be outfitted with an optional 56"-long bar to do the trick, but that will set you back an additional $90. Although this tool’s adjustability is a unique advantage, I think it’s better suited as a secondary guide to be used when making precise angled cuts after breaking down panels.
Ripping Guides
You can’t beat a tablesaw for making straight-line cuts, but wrangling a 100-lb. sheet of 3⁄4"-thick MDF across a tablesaw isn’t for everyone. Sometimes it’s better to take the tool to the work instead of the other way around. That’s when ripping guides really earn their place in the workshop and on the jobsite.
 Guide Rail Kit
WoodRiver’s Guide-Rail Kit combines two guides in one. Each of the two 56"-long aluminum extrusions can be individually used for crosscutting panels, or the two can be joined with a connector to create a guide that will span an 8'-long sheet. The panel clamps fit into the rail’s bottom track and can be set anywhere along its length. A variety of optional accessories makes the guide a nice choice for the undecided. The kit can be paired with a universal router/saw baseplate (#149196, $31.50) to keep a tool on track. A protractor head (#150005, $37.99) is also available for making angled cuts. The guide rail kit is as easy to set up as the All-in-One. However, the clamps require too much underside clearance to allow working on the floor, so you’ll have to set your panel on sawhorses. The versatility afforded by the sliding clamps and two-part bar is a plus for transport and storage, but the separate parts are easy to misplace, as opposed to a onepiece guide. Also, to prevent deflection of the 112"-long bar, you’ll need to either provide additional support at its center or avoid excessive sideways pressure with the saw.

T-Square Guide
Kreg’s Rip-Cut guide offers an alternative approach to ripping sheet goods. Employing the guide as a sort of integral extended saw fence enables ripping sections up to 24" wide, regardless of length. I found that I could rip subsequent sections in less time than it would take to reset the clamps on a typical straightedge guide. And, thanks to the cursor on the base and increments on the guide arm, it’s easy to reset the saw without pulling out a tape measure and offset spacers. This might be the only guide you’d need for jobsite carpentry, but for shop woodworking and cabinetry, you may want a straightedge guide for backup. Unlike a straightedge, the RipCut guide follows the edge of a panel, so if it isn’t straight, the cut won’t be either. And, compared to using a full-length guide, I found that the relatively short 10"-long bearing fence allowed the saw to rotate somewhat, veering from the cutline.


