
This plan is courtesy of Sylvan Tool Works, Inc.
Think about safety!
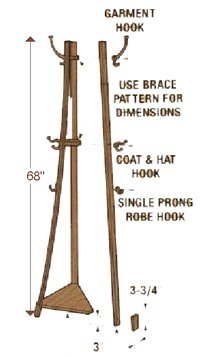
This plan is designed to help you make the Hall Tree. Enjoy your work! Read, understand, and follow all product use instructions. Follow all tool and product guidelines and safety instructions. Work safely!

Recommended Tools and Materials
•Safety glasses & all safety gear, as required by the instruction manuals for the tools and materials you use.
•Dust Collector
•Standard layout & measuring tools
•Table saw with carbide-tipped combination blade
•Jointer
•Thickness planer
•Power sander
•Table saw with combination blade
•Band saw with 1/4" - 6 teeth per inch blade
•Power sander
•Power drill
•9/64" tapered drill bit with 3/8" diameter countersink
•100, 150, and 220 grit sandpaper
•Screwdriver
•Scissors
•Wood vise & clamps as needed
Materials
•12-3/16" x 14-1/2" x 1/4" thick plywood
•Fifteen 1-1/4" long #10 brass wood screws
•Three large brass garment hooks
•Three brass coat and hat hooks
•Three brass robe hooks
•Six 1/2" long brass screws
•1" wide (commercial) double stick tape
•Yellow aliphatic resin wood glue
•Gap filling cyanocrylic glue
•Finish of choice
Note: Select defect free white oak to make all the wood parts of the Hall Tree.

Board List (Finished Dimensions)
•Three 1-3/8" wide x 68" long x 1/2" thick uprights
•One workpiece 14-1/3" wide x 12-3/16" long x 3/4" thick
•Three workpieces 1-3/8" wide x 3-3/4" long x 1/2" thick

Hall Tree Instructions
1)Carefully select straight edged white oak lumber that is warp-free. Joint the edges and cut the workpieces to the required sizes.
Follow the board list for all dimensions. TIP: If you do not own a jointer, buy the lumber jointed and planed.

2) Glue and clamp two 3/4" thick boards together to form a 14-1/2" wide x 12-3/16" long workpiece. Allow the yellow wood glue to cure for 24 hours.

3) Make all three full sized brace templates by first cutting out each brace patterns with scissors (cut on the outside edge of the lines).
Accurately cut a 1/4" thick piece of plywood to a 14-1/2" wide x 12-3/16" long rectangle. Spray a light coat of temporarily bonding adhesive on the back of each pattern. Align the top and bottom edges of the large bottom pattern (sticky side down) on the plywood panel. Carefully align the top and bottom of the pattern to the top and bottom of the plywood rectangular panel. Mount the remaining two smaller paper brace patterns on unused plywood by using the same technique. Make the three plywood templates by cutting them out on the band saw. Remove and save the paper patterns from the plywood templates. Complete steps 4, 5, 6, and 7. Optional: keep the paper on the templates for future use.

4) Align the top and bottom edges of the largest plywood template on top of the 14-1/2" wide x 12-3/16" long x 3/4" thick workpiece made in Step 2.
Remove the clamps used to make the glue-up. Securely hold the template in position and use a pencil to trace the brace template shape onto the workpiece. Lay out the middle and top pieces on unused portions of the workpiece.

5) Cut out the three braces on the band saw.
It is best to cut on the outside edge of the traces line, this way you can sand to an accurate finished shape.

6) Adjust the band saw trunnion to a 12° setting, lock the band saw table in place and bevel cut all three corners of the large bottom brace (the best looking surface of the brace is facing down on the table). Form the bevels by cutting as little of the wood as possible. Make sure the bevel cuts away as little of the wood as possible. Make sure the bevel cut extend all the way from edge to edge. All three bevel cuts are identical. Sand all workpieces before assembling the various parts. Progressively work through 100, 150, & 220 grit sandpapers until you like the sanded look. 7) Clamp the bottom brace in a wood vise then drill one 9/64" diameter hole (3/4" deep) in the center of each of the three beveled corners. It is very important that the holes are drilled perpendicular to the surface of the workpiece. A wood vise is needed to hold each of the three braces during drilling.

7) Clamp the bottom brace in a wood vise then drill one 9/64" diameter hole (3/4" deep) in the center of each of the three beveled corners.
It is very important that the holes are drilled perpendicular to the surface of the workpiece. A wood vise is needed to hold each of the three braces during drilling.

8) Center the garment hook hardware on one corner edge of the small top brace, mark the drilling points through the holes in the hardware, then drill both 9/64" diameter holes (3/4" deep). It is very important to drill the holes perpendicular to the surface. Otherwise the parts will not fit tightly together. Repeat this drilling process on the two other brace corners that will be fastened to the 68" long uprights.
9) Center the coat and hat hardware on one edge of the middle brace, mark the drilling positions then drill the holes (as in Step 8).
The exploded view shows how the uprights and braces are drilled and screwed together.

10) Align and fasten the three 1-3/8" wide x 1/2" thick oak uprights together with double stick tape.
Make sure all ends and edges are flush to each other. This technique is used in order to drill perfectly aligned perpendicular holes in all three uprights. Use the drilled holes on the garment, coat and robe hook hardware to center, mark, and drill 9/64" diameter holes as positioned in the Exploded View. Use a scrap backing board to prevent drilling tear out. The holes are spaced 3-1/2", 21-3/4", and 32" from the top ends of the uprights. Once all holes are drilled, separate the uprights and sand all parts. Clean the parts with a tack cloth and apply the finish.

11) Assemble the garment hooks and uprights to the small top brace with 1-1/4" long #10 brass wood screws. Use the Exploded View as a visual guide to put together the parts of the Hall Tree.

12) Align and assemble the coat and hat hardware to the middle brace.
The pre-drilled holes make it easy to screw together the parts. Use 1-1/4" long #10 brass wood screws.

13) Position the large brace as illustrated - drill and countersink a 9/64"diameter hole a distance of 3-3/8" from the bottom of the upright (repeat this on all three uprights). Center the holes so they will line up with the previously drilled pilot holes in each corner of the bottom brace (Step 7). The brace must be in the final position (see photo) when these holes are drilled so all drilled holes line up. The 12° bevels must be flush to the uprights.
TIP: Drill one upright and carefully screw the parts together with one 1-1/4" long #10 wood screw. This helps to hold everything together as you drill the other two holes. Complete each process and screw all parts together. Use glue to secure the 1-3/8" wide x 3-3/4" long x 1/2" thick "feet" onto the bottom of each of the three uprights. Make sure each glued on foot covers the screw hole made in this step. The hall tree is now ready for action—so enjoy! post or on a pole, or on a tree.


