
Show off your collectibles in high style.
Overall dimensions: 16"d × 40"l × 38"h
Many moons ago, I made and installed three fireplace mantels with wide, utilitarian tops for one of my brothers. He loved the design, the finished look, and the craftsmanship, but most of all, he was thrilled to have three broad surfaces to display all his “stuff.” Here’s a design that does the same and goes a few steps further. This side table makes an elegant statement in any foyer or hallway. It stores and displays your favorite collectibles inside while the top presents a convenient surface to hold gloves, hats, keys, or other daily gear.
Strong, durable mortise-and-tenon construction connects the aprons to the legs, and a lower stretcher system prevents racking and rocking while letting you try your hand at router dovetail joinery. Paired doors swing open on easily installed, adjustable cup hinges that lower the doors slowly and then hide from view. The rabbeted edges of the frames create an attractive shadow line and provide a finger recess for lifting. As a bonus, adjustable dividers let you sort your cache in any number of configurations.


 Make the legs
1 Mill the legs (A) to the thickness and width shown in the Cut List, taking care to make the faces precisely square to each other. Square their ends as well, but keep them a couple inches longer than their final length for now.
2 For reference, mark the leg faces to be mortised. (A simple line at each mortise location will do.) Then plunge-rout the pocket at the top of each leg (A), where shown in Figure 2. To do this, clamp the legs together on the bench to provide footing for the router, and use a simple L-shaped panel as a fence to guide the router (Photo A).
3 Square the inside corners with a chisel (Photo B). Then smooth the leg pockets through 220 grit. I use 1⁄8 × 1 1⁄2 × 6"-long hardwood sanding sticks to which I have affixed 180- or 220-grit sandpaper. (When the ends of a stick dull, you can “refresh” them by trimming them on the mitersaw.)
4 Lay out the curves at the top of the legs, as shown in the Leg Detail in Figure 1. Bandsaw just outside your lines (Photo C), and then smooth the curves on a disc sander or with a hard block wrapped with 180-grit sandpaper.
5 Crosscut the legs to the final length shown in the Cut List.

Arranging Grain
Judiciously laying out project parts with regard to grain orientation can make a big difference in the beauty and structural integrity of your furniture. For example, legs and other elements with four exposed faces generally look best with relatively straight grain on all the faces. To attain this, use riftsawn stock, on which the annular rings–as viewed on the end of the piece–run diagonal to the faces. (Riftsawn stock is typically found near the edges of regular plainsawn boards.) If your leg blanks include curving grain, orient them so the grain will slope outward at the bottom ends of the finished legs to give the work a more “planted” appearance.
To ensure that tenons are as dimensionally stable and strong as they can be, cut aprons and rails from quartersawn stock, where the annular rings run nearly perpendicular to the board’s face. You’ll typically find quartersawn stock near the very edges of plainsawn boards.


Make the aprons, rails, and stretchers
1. Mill the aprons (B, C), the top rail (D), the bottom rails (E) and the stretchers (F) to the dimensions shown in the Cut List. For now, keep the stretchers (F) longer by an inch or two. Mill a short length of extra apron stock for machine setups later.
2. Lay out the leg (A) mortises for the aprons (B, C) and the bottom rails (E), where shown in Figure 1. Square lines across the stock to indicate the length of each mortise.
3. Rout the intersecting apron mortises at the top of the legs using a plunge router equipped with a 1⁄2" spiral upcut bit. Set your router’s depth stop to cut 1⁄32" less than the 1" final depth shown in Figure 1. This ensures the bit won’t bottom out on the wall of the adjacent mortise. As before, gang the legs together to provide router footing, but this time clamp the first leg to the bench instead of between dogs. Alongside it, place the leg to be mortised, sliding it back about 6", and position the remaining two legs in line with the first leg. Adjust your edge guide to bear against the first leg with the bit centered on the second leg. Rout to your end marks, plunging in 1⁄4"-deep increments to minimize chatter (Photo D). Once you’ve cut the first mortise, unclamp the three legs, rotate the second leg, re-clamp, and rout the intersecting mortise. Repeat this procedure until you’ve cut all eight mortises. Finish by squaring the ends of the mortise with a chisel.
4. Rout the mortises in the legs for the bottom rails (E) in the same manner. This time, adjust the bit depth 1⁄32" deeper than the mortise depth shown in Figure 1 so your tenons don’t bottom out.
5. Using a tablesaw with a dado blade, cut the tenons on the aprons (B, C) and bottom rail (E), where shown in Figure 1. To cut the offset tenons on the aprons, set the dado height to 1⁄2" and saw the inside cheeks, then lower the blade to 1⁄8" and saw the outside cheeks. To cut the centered tenons on the bottom rails, simply raise the cutter to 5⁄16" and cut both cheeks (Photo E).

6. With the blade still set at 5⁄16" high, cut the short shoulders on the bottom rails (E). Then cut the offset apron (B, C) shoulders in two steps, sawing the first shoulder with the blade 1⁄4" high, and the second opposite shoulder with the blade 1" high. Fine-tune the fit of the joint cheeks with a file or shoulder plane.
7. Miter the ends of the short and long apron (B, C) tenons to 45°, as shown in Figure 1.


 Rout the dovetail joints
1. Smooth the inside faces of the long aprons (C) and bottom rails (E). (It’s important to do this before routing the dovetail sockets, as subsequent scraping and sanding will loosen the joint.)
2. Lay out the two sides of the 1 1⁄4"-wide dovetail socket on the inside of each apron, and mark stop lines 3" from the top edge, where shown in Figure 1.
3. Make the dovetail socket jig shown in Figure 3. Chuck a 1⁄2" dovetail bit in a plunge router, and set it for a 7⁄16"-deep cut.
4. Clamp a long apron (C) under the jig, and rout its dovetail socket (Photo F). To avoid exit tear-out, first make a few initial shallow climb-cuts along the length of the socket opening, guiding the router opposite its normal direction, while keeping a firm grip on it. Then pull the router into the work, guiding it against the right-hand fence and stopping when the cut reaches the line. Waste the middle area with a series of light cuts, pushing the router away from you, and then finish up by pushing the router away from you against the left-hand fence.
5. Lay out the dovetail sockets on the bottom rails (E), and then rout them in the same manner, but add spacers to the jig fences, as shown in Photo G.
6. Dry-assemble the table, and determine the length for the stretchers (F) by measuring the distance from socket bottom to socket bottom on the bottom rails (E). Cut the stretchers to length.
7. Outfit your table-mounted router with the same dovetail bit, and adjust it to the same height (7⁄16") as before. Make an auxiliary tall fence with a cutout on one edge for the router bit, and screw it to your main fence as a workpiece support.
8. Adjust the fence so the narrowest section of the bit protrudes a hair past the face of the tall panel. Using a square back-up block to feed the work, make a trial cut in the extra apron stock you milled for the purpose. Then flip the stock over and rout the opposite face. Test the fit in a dovetail socket, and adjust the fence in or out as necessary until the dovetail fits tight in its socket with just a hammer tap. Once you’re set up, rout the long dovetail shoulders on the top rail (D) and the two stretchers (F), as shown in Photo H. Then readjust the fence to cut the 1⁄4"-wide shoulders on each stretcher and the 3⁄4"-wide shoulders on the top rail, making the latter in several passes.

9. Chisel the bottom end of each dovetail to a half-round, undercutting it at the corners to the approximate angle of the socket (Photo I). Cut and test-fit the joint until the edges of the pieces sit flush with each other.
Glue up the table
1. Finish-sand all the parts through 220 grit, and ease over any sharp edges.
2. Glue and clamp each end frame, consisting of two legs (A), a short apron (B), and a bottom rail (E), as shown in Photo J. Check for square by comparing diagonal measurements while under clamp pressure.
3. Once the glue has dried, connect the end frames to the long aprons (C) with the table upside down. Again, check that the legs are square to the aprons (Photo K).


4. Brush glue into the dovetail sockets in the long aprons (C) and on the dovetails on the top rail (D), and tap the rail flush with the aprons.
5. Add the stretchers (F), brushing glue on both the tails and their sockets before tapping the joints home.
Working Leather and Wood
Incorporating leather into furniture adds a dimension of richness and softness to your woodworking. The approach I describe here for covering the display table panels can be used for applications ranging from desktops and other work surfaces to dividers and even entire walls. While it’s easy enough to simply glue leather to wood, follow these directions to ensure that your leather looks good and stays soft and supple over time.


1. Sand both sides of the plywood bottoms (G) through 180 grit.
2. Dampen the back (rough side) of the bottom leather skin with a water-soaked sponge, fold the leather in half, wet side on the inside, and let it sit and absorb while you move to the next step.
3. Mix white or yellow glue with 10% water to prevent it from unduly stiffening the leather, and roll it onto the underside of the plywood bottom, making sure to cover the entire surface. Then run a bead of full-strength glue around the perimeter (Photo 1).
4. Lay the wetted side of the leather skin onto the plywood, centering it and smoothing it with your hands working from the center outward. Use firm pressure with a roller to remove any wrinkles or creases. Set the panel aside to dry. As the leather dries, it will shrink and pull itself tight and crease-free. Once the glue is dry, trim the leather flush to the edges of the panel.
5. Set each plywood bottom panel on its topside skin, and then lay out and cut the corners at 45°, staying about 3⁄16" away from the corners of the plywood to enable neat wrapping (Photo 2).
6. Wet the topside leather skin, and apply glue to the plywood as before. Lay the leather wet-side up with the plywood centered on top of it so that the skin’s corners are equidistant. Press down a bit, and then flip the panel over and press and smooth the leather as before.
7. While the glue is still wet, clamp the panel in an edge vise, and use 5⁄16" staples to secure the leather to the edges of the plywood. Start from the center and work outward, pulling the leather toward the corners as you staple (Photo 3).
8. Trim the excess flush to the plywood’s bottom face with a utility knife.
Make and install the leather bottoms
1. Gather the bottom and top leather skins (H, I) and measure the thickness of two pieces held together. I used a caliper to do this, but a ruler that reads in 1⁄64 increments is plenty accurate.
2. Measure the openings in the table, and cut the plywood bottoms (G) to those sizes, subtracting the thickness of the two pieces of leather.
3. Cut or sand a 45° chamfer about 3⁄16" wide on each corner of the bottom (G) to leave room for the leather at the inside corners of the table, as shown in Figure 1. Ease over all the sharp edges.
4. Use a pair of heavy-duty scissors or a mat knife to cut your bottom leather skins (H) oversized to 131⁄2 × 173⁄8”. Cut the top leather skins (I) to the size in the Cut List.
5. Attach the leather to the plywood bottoms (G). (See sidebar, “Working Leather and Wood,” above.)
6. Cut and add the short and long cleats (J, K), positioning them flush with the bottom edges of the aprons (B, C) and the top rail (D). You can glue and clamp them in place, or use glue and a pin nailer as I did. After checking the fit of the panels, set them aside for now.

For a safe, smooth, controlled cut, use a long board with a heel to push the dividers past the beading bit.

Guide each short divider using an auxiliary miter gauge fence to prevent exit tear-out. Register the end of the work against the rip fence.

Cove the top end of each notch with a chain-saw file, using a 3⁄4" panel behind the divider to limit the depth of cut.
Make the dividers
1. Mill the short and long dividers (L, M) to the sizes shown in the Cut List. Thin stock like this is prone to buckling and shattering in many thickness planers, so I used a shop-made riser panel in my planer to do the job. (See “Planer Riser for Thin Stock” in Tips & Tricks.)
2. Round over the top edges of the dividers with a 1⁄4" beading bit on the router table (Photo L).
3. Cut a 1⁄4"-wide × 7⁄8"-high notch in the center of each short divider (L), as shown in Photo M.
4. Use a 7⁄32" round chainsaw file to lengthen each notch to 1". To do this neatly, place a 3⁄4"-thick board adjacent to the inverted divider on the bench to serve as a depth stop. File the notch until the tool contacts the board, as shown in Photo N. Press a bit sideways with your final strokes to fair the curve.
5. Cut the leather strips to the sizes shown in Figure 1.
6. Determine the final length of the dividers (L, M) by subtracting the thickness of two pieces of leather from the width and length of the table opening. Then crosscut the dividers to final length, trimming equal amounts from the ends of the short dividers (L) to keep the notches centered.
7. Glue the leather strips to the ends of the dividers as you did the plywood panels.


Make the doors
1. Mill the stiles (N) and rails (O) to the dimensions shown in the Cut List.
2. Rout the mortises in the stiles to the dimensions shown in Figure 4, using the same setup and technique as you did with the legs (A). Although the finished mortises are 3⁄4" deep, set your router for a 1"-deep cut, as you’ll be removing 1⁄4" from the stiles later.
3. Saw the tenons to the dimensions shown in Figure 4, using the miter gauge and a dado blade on the tablesaw as before. Check the fit, and trim any fat tenons with a shoulder plane.
4. Dry-assemble the frames and flush-up any offset joints with a hand plane. Then disassemble the frame.
5. Chuck a 1⁄4" rabbeting bit in a table-mounted router, and set its height to 1⁄4". Rout a 1⁄4 × 1⁄4" rabbet in the stiles and rails, placing the “show” face down on the table and guiding the work with a pushstick.
6. Lay out and mark a line 3" in from the ends of the stiles (N) on their inside edges, where shown in Figure 4. Then trim away 3" of the rabbet from each end of the stiles (Photo O).
7. Crosscut at your 3" mark with a handsaw or tablesaw to remove the waste.
8. Smooth all the surfaces on the stiles and rails except for the outside edges by sanding through 220 grit.
9. Dry-assemble the frames again, and cut a carefully squared 1⁄4" plywood panel to fit inside them. This temporary “squaring panel” should measure 13" × 141⁄8", but adjust the size if necessary to create a perfectly snug fit. Miter the panel corners to allow access to the inside corners of the frame during glue-up.
10. Glue and assemble the frame with the panel inserted to keep everything square (Photo P).
11. After the glue dries, hand-plane or sand the doors until they fit easily inside the leg pockets. The doors should meet in the middle with an even 1⁄64" gap between them.
12. Back at the router table, rout the 1⁄4" × 3⁄8" rabbets on the three outer edges of each door, as shown in Figure 4 and Photo Q. After routing, do any final fitting to the doors, and then sand the edges smooth through 220 grit, and ease over any sharp edges.

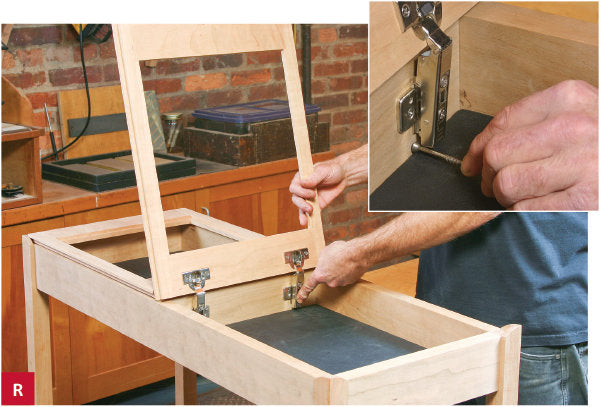
Attach the top
1. Drill the holes for the cup hinges on the drill press using a 35mm bit, locating the centers, where shown in Figure 4. Important note: Check the tip of your bit; if it’s more than 1⁄16" longer than the bit’s cutting edges, you’ll need to grind or file it down to a shorter point to prevent it from poking through the face of the door.
2. Insert the hinges into their mortises, and use a small square to make sure each hinge plate is square to the edge of the door. Then drill pilot holes and install the screws.
3. Attach the baseplates to the top rail (D), locating the pilot holes, where shown in Figure 1.
4. Attach each door by snapping the hinge arm onto the baseplate (Photo R). Using a Pozi or Phillips driver, adjust the hinges’ set screws until the doors open and close smoothly and the gaps are even.
Apply your finish
1. Remove the hardware from the doors and the top rail, marking the parts for return to their specific locations later to preserve the door alignment. Also, remove the leather bottoms and cover the ends of the dividers with painter’s tape to protect the leather caps against finish spillage.
2. Finish-sand everything through 220 grit.
3. Apply the finish of your choice. I wiped on four coats of Waterlox, smoothing the first two dried coats with 320-grit sandpaper, and rubbing out the last coat with #0000 steel wool after it cured. Wiping on a topcoat of Arm-R-Seal completed the job. You can clean up and protect the leather bottoms by rubbing on paste wax and wiping it off with a clean cloth. Shoe polish also works great and comes in a variety of colors.
4. Once the finish is dry, reinstall the leather bottoms. If the panels are a press-fit, you can leave them unattached on the cleats. If they’re a bit loose, pin or brad them through the cleats from below the table.
5. Stick a couple of bumpers under the doors, where shown in Figure 1, to quiet their closure.
Add the glass
1. Cut a 1⁄4" plywood panel 1⁄16" smaller in width and length than the opening in the door frames. Take this template to a glass shop, and have them make you a piece of 1⁄4"-thick plate, or float, glass to match. Specify that the edges be “flat-polished” to clean and smooth them.
2. Run a 1⁄8" bead of clear silicone caulk in the door rabbets, and lay in each glass sheet. Center it between the rabbets to create a 1⁄32" gap around the perimeter.
3. After the caulk dries, check the doors once more. They should lift easily and stay open hands-free at about 20° past vertical. Let the soft-close hinges do the work of lowering them in a slow, controlled motion. Final contact is a silent affair, thanks to the bumpers.

About Our Designer/Builder
Andy Rae is an award-winning furnituremaker whose career spans several decades. He has authored a number of books on woodworking, including The Complete Illustrated Guide to Furniture and Cabinet Construction (Taunton Press). He currently makes his home in the mountains of Western North Carolina.


