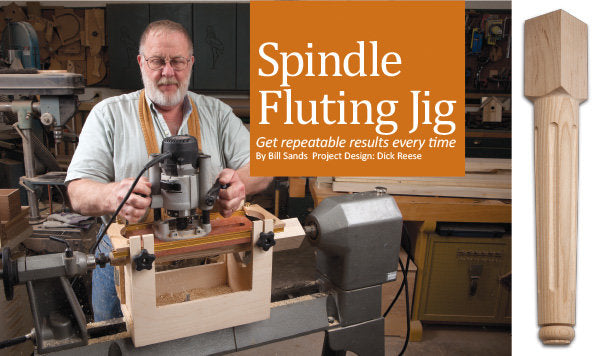
Get repeatable results every time
Project Design: Dick Reese
Making identical flutes of the same length and depth and spaced evenly around the circumference of a tapered or cylindrical spindle such as a table leg requires a lathe, router–and one more thing–a precision jig. Mounted to your lathe, this accommodating shop project features a router platform that adjusts parallel to the workpiece surface for flutes of a consistent depth from one end to the other. Attached to the platform are T-Track runners that support sliding stops. These lock in place, letting you create flutes of a repeatable desired length. Another locking mechanism secures the jig’s base to the lathe’s ways. Here’s how to build the jig and put it to work.
Note: Made from scrap plywood, hardwood, and store-bought hardware, this jig allows you to rout flutes up to 10" long. To cut longer flutes and to customize the jig to your lathe, follow the instructions and use the Cut List dimensions only as a general reference.

Build the jig
1 Cut the jig bottom (A) from 3⁄4" hardwood plywood to the width in the Cut List and to the desired length. The listed width allows you to rout flutes in cylinders up to 5" in diameter. Add 1" of bottom length for each additional 1" of desired flute length. After cutting the bottom to size, drill the centered 3⁄8" hole (Figure 1).
2 From 1⁄2" plywood, cut the sides (B) to size. For the width, measure the distance from the ways to the center of the spindle, and add 4" to 6". For the side lengths, 15" works well for 10"-long or shorter flutes. Add 1" for each additional 1" of flute length.
3 Lay out and cut the windows in the sides (B), as shown in Figure 1, using a bandsaw or jigsaw. Saw just outside the line, and then sand the rough edges smooth.
4 Mark the centered 1⁄4" wide by 2 3⁄4" deep slots in the sides (B) (Figure 1), and cut these to length at the router table, using a straight bit, router fence, and stop. To do this, raise the bit 1⁄4", and set the stop on the outfeed side of the fence. Make the initial cut for one slot, and then flip the piece end for end to cut the other slot. Similarly, rout the other side part. Raise the bit, and repeat the procedure as needed to rout slots in both sides.
5 Cut the ends (C) from 3⁄4" plywood to the same side-to-side width as the bottom (A). Determine the width by measuring the distance from the lathe ways to the center of the spindle and subtracting 2 1⁄2". Lay out the curves along the inside edges to match your router base and bandsaw them to shape (Figure 1).
6 Drill pocket holes in the bottom (A), as shown in Figure 1, and then drive pocket-hole screws to attach the bottom to the sides (B). (Or simply drive screws through the sides and into the base.) Fit and glue the ends (C) in place.
7 Plane a piece of hardwood to 5⁄8" thick for the adjustable platform (D). Rip it to a width that measures the same as the distance between the sides (B), less 1⁄16". (This allows for easy adjustment between the sides.) Now, crosscut the piece to 1" less than the length of the sides (B).
8 Lay out the centered 1"-wide slot (sized for a 1" OD router guide bushing) on the adjustable platform (D). Make the slot’s length at least 1" longer than the length of your intended flutes. Next, using a 1" Forstner bit in a drill press, bore centered holes inside the ends of the laid out slot. Saw out the waste between the holes, staying inside the lines.

Trim off the waste in the slot by guiding off the scrapwood straightedge.

Cut a centered slot in both ends of the adjustable platform with an auxiliary tall fence and pushstick.
9 Using double-faced tape, adhere a straight piece of scrap onto the top face of the adjustable platform (D), tangent with the holes drilled in Step 8. Chuck a bottom-bearing flush-trim bit in your table-mounted router, and then trim off the remaining waste in the slot, as shown in Photo A. Achieving a slot with perfectly parallel edges is critical to the jig’s fluting accuracy.
10 Raise the tablesaw blade to 7⁄8", and add an auxiliary tall fence to the saw’s fence with double-faced tape. Now, with a pushstick, cut a centered slot in the ends of the adjustable platform (D), as shown in Photo B. Adjust the fence as needed to cut a centered 1⁄4" slot, flipping the workpiece edge for edge and end for end with each fence adjustment. Test-fit the all-thread rod (see Figure 1) in the slots.
11 With a tablesaw or a straight bit in a table-mounted router, cut the 3⁄4" rabbets 1⁄16" deep in the top face of the adjustable platform (D). Cut two T-Tracks 4" longer than the length of the platform, and install them centered in the rabbets with screws.
12 Rip a 2"-wide piece of 3⁄4" hardwood. From it, crosscut two stops (E) that are equal in length to the width of the adjustable platform (D). Next, rabbet the ends (Figure 1), and mark the inside edge of each piece. Drill 1⁄4" holes in the rabbets 3⁄8" from the ends and 1⁄2" from the inside edges. Finally, as a way to maximize the travel distance for the router without further extending the T-Tracks, I cut out arcs on the inside edges of the stops, but straight-edged stops would work equally well. Add the washers and five-star knobs to the end of the all-thread rod.

Fit the jig to your lathe
1 Measure the distance between the inside walls beneath your lathe’s ways. Then trim a 1⁄2"-thick to a width just under you ways’ slot width from hardwood scrap. Cut the piece to 3⁄4" longer than the distance between the ways’ walls. Drill a 3⁄8" centered hole through the piece, and disc-sand a gentle arc on the ends, removing 3⁄8" from two opposing corners (Figure 1). You want this cam-action lock block (F) to jam between the ways’ walls when tightened in place.
2 Using the distance between the ways for the width of the ways spacers (G), cut two 3⁄4"-thick pieces of plywood or hardwood to 3 1⁄2" long. Test their fit between the ways and then center, glue, and pin them onto the jig’s bottom (A).
3 Insert the carriage bolt through the lock block (F), and add the washer and five-star knob. Test-fit the jig onto your lathe and tighten the knob.

Fit a thin spacer between the platform and turning to establish the angle of the platform for a consistent flute depth from end to end.

Use the measurement between the edge of your router’s baseplate and bit to set up the stops, guiding off the marks on your workpiece for the ends of the flute.

Put the jig to work
1 Center the jig on the lathe bed between the headstock and tailstock, and lock it in place. Loosen the all-thread rod and hardware and lift off the adjustable platform (D). Secure your tapered or cylindrical turned workpiece between the centers.
2 Mark the length and location of your flutes on the turning. Determine the number of flutes and set the detent on your headstock. You will need to be familiar with the number of detents on your particular lathe to know how to figure the degree of rotation and number of detents from one flute to the next. (The lathe I used had 24 evenly spaced detents over 360° of circumference. That meant that the distance between detents equaled 15° [360° ÷ 24 = 15°]. For the turned leg on page 62, which called for six flutes, I divided six into 360°. The resulting 60° was the spacing between each flute. So I rotated the turning to every fourth detent [4 × 15° = 60°] to achieve the needed number of flutes.) Now, rotate the turning and stop where needed (based on your number of flutes). Note that the number of flutes must divide into the number of detents available and result in a whole number (24 ÷ 6 = 4) for you to use the jig. Make a pencil mark on the workpiece at each stop for easy, quick reference.
3 Replace the platform (D). Slide a thin spacer such as 1⁄8" Baltic birch plywood between it and the turning, as shown in Photo C. Now lock the platform angle in place, and remove the spacer.
4 Outfit your plunge-router baseplate with a 1" OD guide bushing, and chuck in the desired fluting or core-box bit. Mark the start and stop points of one flute on the workpiece. Next, measure the distance from the perimeter of the bit to the outside edge of the baseplate. Use this measurement and the start and stop marks to set up your stops (Photo D).
5 Set the router on the platform (D), fitting the bushing in the slot. Lower the bit onto the turning. Guiding off of this bit depth, set up the plunge stops in increments to make multiple light cuts to the desired flute depth. Turn on the router and cut a shallow flute. Adjust the stop, and cut a deeper flute. Continue until you reach the needed depth. Rotate the piece, and cut the remaining flutes.


