
An exercise in template-making yields a great gift project that’s easy to duplicate
When some good friends got married recently, I decided to make them a custom serving tray that was certain to stand out among any store-bought gifts. I wanted it to be beautiful, unusual, and built to last. I started with the idea of flared sides, but decided against the compound joinery involved in angling all four sides, so I stuck with two. This led to the idea of extending two shaped sides to accept a pair of spindle-turned handles. So far, so good. The next challenge was the bottom: Capturing it within grooves in the tray walls would require using plywood for stability, but I worried that it might delaminate due to spilled liquid. I realized that I could use solid wood by letting the bottom run under the tray ends, where it could move freely in response to seasonal changes. I also recognized that the bottom would provide a great opportunity to resaw some special spalted maple for a one-of-a-kind book-match. I ended up with a great gift with a bonus: the template that I created to do the shaping makes it easy to duplicate this project for future gifts. And that’s a gift to me!

Made to serve; built to last
This solidly built tray will be proudly serving drinks and snacks for many years to come. The ends and handles connect to the sides with mortise-and-tenon joinery, while the solid wood bottom is free to expand and contract seasonally, sliding underneath the tray ends.
Construction steps:
- Create a half-template of the tray side
- Use the half-template to make a full-template
- Make the tray sides
- Turn the handles
- Make and fit the bottom and ends
- Pre-finish and glue up
 A perfect half makes for a perfect whole
The most accurate way to make a symmetrical template is to rout the shape using a half-template that guides the router bit. After routing one half of the finished shape, the half-template is flipped on a centerline to complete the other half. Because the shape is dependent on the half-template, spend the time necessary to make it well.
Begin by sawing two 3 × 22" template blanks from 1⁄4"-thick hardwood plywood. Print out the half-pattern, and glue it to the face of one of the blanks, aligning the bottom edges. Drill the 1⁄2"-dia. holes for the handle, and a hole at each end of what will be the mortise slot. Then saw and sand the profile to perfection, and rout the recess as shown.
Make the full template using the half-template
Now you’re ready to use your perfect half-template to make a perfect full template. The basic approach is to use the completed half-template as a drilling and routing guide to almost completely shape the first half of the full template, and then the second half. Begin by taping the half-template to the full-template blank with their lower edges aligned, drill the handle and mortise holes, and then rough-saw the profile, staying 1⁄8" or so away from the edges of the half-template. Then flush-trim as shown. Flip the template and repeat the process to make the other half. After shaping both halves, the final step is to saw between the mortise holes to create the mortise slots.


Make the tray sides
Making the sides is a simple matter because all of the cuts are guided by the template. However, before you start using the template, make sure to mark one face “A” and one face “B” to ensure mirror symmetry in use. Then use the template to trace the shape onto 3⁄8"-thick stock, aligning the bottom edges of the template and stock. Saw and rout the shape, and then drill and rout the joints. To begin, trace the template shape onto a side blank and jigsaw to within 1⁄8" of the line. (Important: Do not saw the recess shape at the bottom edge.) Then attach the template with double-faced tape, and use a 1⁄2"-diameter Forstner bit to drill the 1⁄4"-deep handle holes, using the template holes as a guide. Finally, rout the profile and joints as shown.

Rout the mortises and groove. Outfit a plunge router with a 1⁄4"-dia. upcut spiral bit and a 1⁄2" O.D. template guide. Then rout the two 1⁄4"-deep mortises and the 1⁄4"-deep bottom groove. When routing the groove, take care to feed in the direction shown so that the bit spin pulls the template guide against the template edge. When routing the opposite side, make sure to orient the template with the opposite face upward to ensure perfect symmetry. Finish up by chiseling the ends of the mortises square.
Turn the handles
Referring to the drawing, turn the handles. Carefully size the tenons for a snug fit in their holes. It’s also crucial for assembly that the distance between the tenon shoulders is exactly the same on each handle. And whatever that distance is (should you decide to alter the width of the tray) it will also represent the length of the tray ends and bottom.

 Make and fit the bottom and ends
The wide bottom typically needs to be glued up from several pieces, so I take the opportunity to resaw book-matched boards to create a visually harmonious panel. (See “Resawing at the Tablesaw,” page 27.) To prepare, mill 4"-wide stock that’s thick enough and long enough to yield 4 pieces at least 13" long. (The extra length allows shifting the pieces for a good match during glue-up.) Face-joint and plane the stock to thickness, joint both edges square, and then resaw as shown. Aim to make the resawn pieces just a hair thicker than 1⁄4". That way, after edge-gluing the pieces together, minimal sanding will smooth the panel to its final thickness. After edge-gluing the pieces to create the 16" width, squarely crosscut the panel to 111⁄8" long, and then sand it to snugly fit the tray grooves. Finally, cut the tray’s end pieces to 3⁄8" thick × 111⁄8" long × 2" wide.

Beautiful glue-up. Go for symmetry. Here, the panel consists of two mirror-matched boards at the center flanked by two outer mirror-matched boards. Align the joints very carefully to minimize sanding afterward.
Tenon the ends; notch the bottom
Set up to cut the tenons using scrap, feeding the stock flat on the table as shown. Making test cuts, creep up on the blade height until cutting both cheeks achieves a perfect fit in the mortise. Then saw the long cheeks on all four tenons. Finish up the tenons by adjusting the blade height and cutting the narrow edges of the cheeks with the stock fed on edge.
Next, referring to the illustration on page 30, mark the corner notches on the tray bottom, measuring outward from its center. Readjust the blade height to reach the cutline, and then saw each notch as shown.


Bevel the ends and bottom to final size
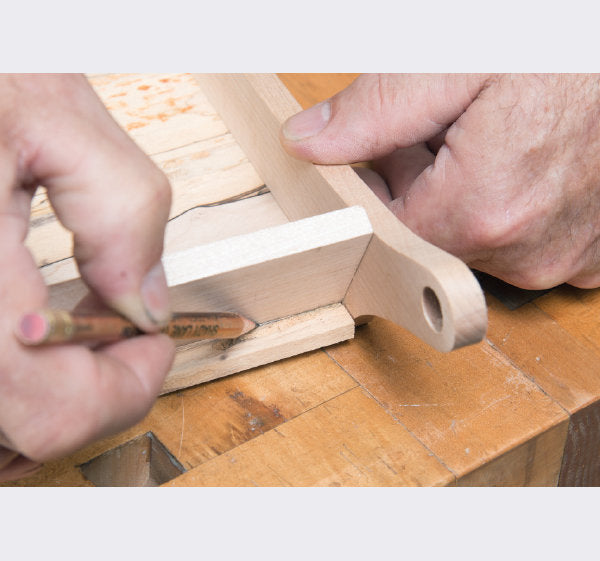
At this point, the tray ends and bottom are still oversized in width. They need to be marked in place, and then cut to size, beveling the edges of the parts at the same time to match the angles of the adjacent parts. Begin by installing the bottom into one tray side groove, and then extend the groove location toward the end of the side as shown. Repeat at all four corners. Next, transfer those knife lines onto both faces of the tray ends. Then rip the necessary bevel on the edge.
Dry-assemble the tray, and trace the slope of the tray side onto the end of the tray end. Also, mark the tray bottom to width. Then rip each tray end to a final beveled-edge width that’s offset about 1⁄8" from the top of the tray side. (Note that the bevel angles on the top and bottom edges differ.) Finally, bevel-rip the bottom to final width.


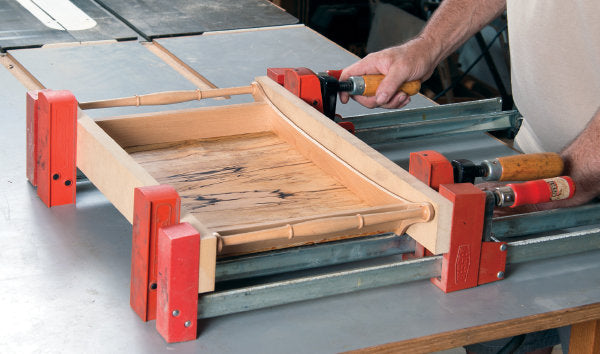 Finish first, then glue up
To finish up, rout a 1⁄8"-radius round-over on the outside faces of the tray sides, and lightly break all other edges with fine sandpaper, finish-sanding the entire tray through 220 grit. Mask off all joint surfaces, and then apply several coats of wiping varnish. Glue up the tray all at once. Place a dab of glue at the center of each groove before inserting the bottom, which will keep the panel centered as it moves seasonally. Apply glue judiciously to the tenons to minimize squeeze-out, and use clamping pads to protect your finished surfaces.


