
Build a super-solid, bar-height table that’s ideal for outdoor use
Most outdoor furniture falls into one of two categories: cheap junk that’s lucky to make it to the following spring; and better-built furnishings that cost as much as a summer cottage. But if you’re a woodworker, you don’t need to settle for poor quality, or pay a fortune to enjoy outdoor furniture that’s beautiful and durable.
The bar-height table I’m building here is the centerpiece of a patio set that includes chairs, as shown on the cover and in the Patio Chair article. I made the entire set from reclaimed cypress, which has good dimensional stability along with excellent resistance to rot and insect damage. Other good “outdoor” woods include cedar, white oak, teak, and ipe, which is sometimes used as outdoor decking.
Without altering the design or joinery details, you can adjust the dimensions of this table to suit available material. For example, two-by stock can substitute for the 8/4 lumber I used to make the tabletop frame and rails for the base.
Loose tenons for the top, through tenons for the base
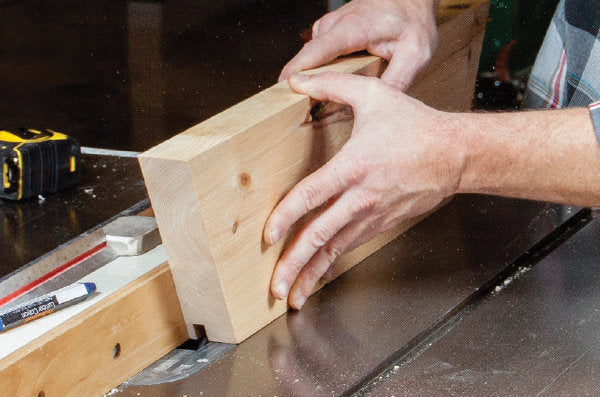
Wooden outdoor furniture needs strong joinery. That’s why my patio set goes together with loose and through tenon joints, assembled with Titebond II. I used my Festool Domino to make all the loose tenon mortises, because it’s fast, simple, and accurate. If you’ve been thinking of buying this tool, here’s your excuse. But if you don’t own one yet, don’t worry. You can plunge-rout the mortises using the techniques explained in the Joinery Class that begins on p. 66.

Construction Sequence
- Make the mitered frame for the tabletop.
- Cut the top slats, then assemble the top.
- Shape the top to its final round form.
- Make the upper and lower rail assemblies.
- Make the legs and assemble the table.
Rail Details
The table’s base is made by joining upper and lower rail assemblies together with four identical legs. The mortises and center lap joints are identical in upper and lower rails. The upper rail assembly requires end laps to be cut so that these rails can nest into the tabletop frame.
Make a 6-sided outer frame for the top…
Making a perfect frame requires spot-on miters and identical segments. To fine-tune your miter gauge, test-miter three segments, and dry-assemble them against a straightedge. Adjust the gauge until the outer ends touch the straightedge with no gaps. (Don’t reset your miter gauge; you’ll use the same setting for the top slats.) After mitering the ends, groove the inside edges for the slats, then mortise the ends. Assemble the frame in two halves, as shown below.


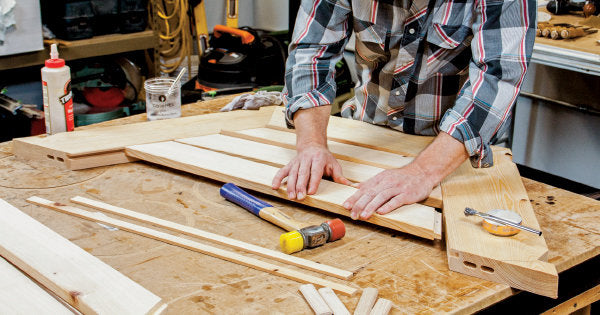
…then fill the frame with slats
With both halves of the top frame assembled, the next step is to fill each half with slats and then glue these two subassemblies together. This work can go quickly if you use your miter saw to make the angled end cuts and your tablesaw (with a dado cutter) for making the tenons that fit in the slotted frame. Install the innermost slat first, then work outward. My cut-to-fit technique ensures accuracy. I cut and tenon one slat end, then lay it in place on the frame to mark the opposite end cut. Insert 1⁄4"-thick spacers between each slat to create a gap for drainage. Then pull the two halves of the top together.


Line them up, then lay them out. Position spacers between the slats, set a straightedge against the cut end of the first slat, and extend the line to obtain the exact length of the next. Repeat the process with the remaining two slats.

 It takes three steps to round the top
Trammel-routing is cleaner cutting and easier than wrestling this top over your bandsaw. To do the job, you’ll need a plunge router, a spiral bit, and a trammel. (You can make one from a piece of 1⁄2" plywood). Pin a pivot board to the center of the table, then draw lines connecting the top’s opposite corners to determine exact center. To ensure your trammel is perfectly centered, check its swing using a pencil before attaching the router. Ease sharp and splintering edges with a chamfer or round-over bit.


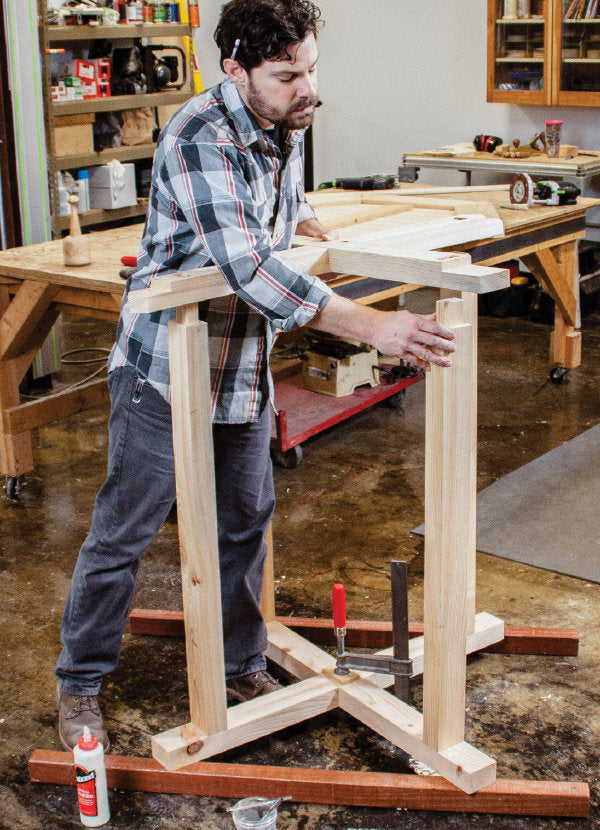
Begin the base by making two rail assemblies
To ensure that the leg mortises on the upper and lower rails match, I started with two identical pairs, cut the mortises, and then trimmed the upper rails to fit the top. Note that one rail’s rabbets are mitered to fit between the top’s frame. I used a miter gauge to cut the shoulder, then used a dado set to nibble out the waste.


Make the legs and assemble the table
After milling the legs and cutting the tenons as shown below, you’re set for final assembly. As with the top, the secret to a hassle-free glue-up is working in stages. Glue up the upper and lower rail assemblies, then install the legs to join them together. Finally, install the leg levellers, and screw the base to the top. Remember to protect your project with a weather-resistant finish (I used General Finishes’ Outdoor Oil).


 onlineEXTRA
If you don’t own a Festool Domino, you can rout the mortises with a plunge router, a 3⁄8" spiral bit, and a simple shop-made jig. For plans and complete instructions, see onlineEXTRAS below.


