
3 joints from just one bit
Dovetail jigs make quick work of drawer and case joinery, but many woodworkers don’t realize that the bits included with the jig can do much more than rout through and half-blind dovetails. These wedge-shaped cutters let you create several other joints that are attractive and that offer a mechanical advantage over their square-edged competition.
Here, I’ll introduce three solid joints that are fast and easy to make using your router table and almost any dovetail bit. To help you select the best joint for your next project, I’ve provided quick-reference guides summarizing strength, complexity, and ease of assembly. In the setup and cutting instructions, I’ve also included some tips for clean, accurate cuts.
Note: I prefer a bit with a 14° cutting angle. A 7° bit will work, but that angle isn’t steep enough to clearly distinguish it from square-edged joints.

Dovetail Rabbet
- Strength – Decent (with pins)
- Ease of cut – Stone simple (single bit/fence setup)
- Clamping – Required
- Uses – Small drawers and boxes

Rest the end piece flat on the router table as shown. Keep the end against the fence.

Without moving the bit or fence, rout the side piece on end. Use a backer to prevent tear-out.

A dovetail corner rabbet puts a fresh angle on common corner rabbets. The Z-shaped joint locks the side and end together, but what I like best about it is that it’s a single-setup joint. When building a run of drawers and boxes, I’ll set up my router table to join the corners, freeing up my tablesaw for other operations. (Note: A standard 1⁄2" dovetail bit works well on stock up to 5⁄8" thick. For 3⁄4" stock you’ll need a larger bit with more cutting height.)
This joint is a cinch to cut on the router table. First, cut your end and side stock to length, carefully squaring the parts. Next, chuck a dovetail bit into the router, and set the height less than the thickness of your stock (I aim for a 1⁄8" lip). Now rout the end piece flat on the table, using a backer block to guide the cut and prevent tear-out (Photo A).
Without readjusting the fence or bit, rout the inside face of the side vertically (Photo B). Again, use a block to steady the stock and prevent tear-out on the trailing edge.
Now for the “tricky” part. Test-fit your front and side. Reposition the fence, and recut the two test pieces until the outer lip of the front piece is flush with the outer face of the side. (I set the fence so that the lip runs a bit long and plane it flush after assembly.)
Like a square-edged rabbetted corner, this joint requires clamps during assembly, but I find the angled edges simplify alignment and require fewer clamps for tight joints.
The half-dovetail prevents the ends from pulling away from the sides, but the sides offer no resistance against the ends pulling away, so additional reinforcement is necessary. After the glue-up cures, pin the sides to the ends with dowels (Photo C).

Dovetail Keys
- Strength – Keys reinforce the miter and look good
- Ease-of-cut – Easy (1 bit, 1 jig, 1 fence setup)
- Clamping – Needed for the miter, but not the keys
- Uses – Casework, drawers, decorative boxes


Dovetail keys reinforce notoriously weak miter joints much like straight splines, but with flair. These decorative “mock dovetails” are suitable for jewelry boxes and other projects where all sides will be visible. You can use this joint on drawers or boxes, with the key size dictated by the height of your bit.
Compared to traditional through-dovetail construction, this joint is simple to cut. However, it requires a bit more preparation than the dovetail rabbet. Before making and installing the keys, you’ll need to miter, glue, and assemble the box. You’ll also need to build a simple sled like the one shown in Photo D.
To rout the slots, install a dovetail bit into your table-mounted router, and adjust the height of the bit so it will be just shy of the box interior with the box riding diagonally on the jig. Clamp stopblocks to the jig to prevent the box from shifting; then rout the sockets, pushing the sled over the bit as shown (Photo D).

Once the sockets are cut, make the dovetail keys. First, prepare a length of key stock wider than the widest part of the socket. Raise the same router bit to full height and rout the sides against a fence, as shown in Photo E. (For snug fitting key stock, take your time and creep up on your cut.)
After you’ve milled the key stock to fit, cut the strip into individual blocks that sit proud of their respective slots. Apply glue, tap the keys into their slots, and wipe off any squeeze-out. Once the glue has dried, trim the keys close to the sides of the box, and then sand or plane them flush to your work, as shown in Photo F.

Sliding Dovetail
- Strength – Super
- Ease-of-cut – Simple, but fussy (2 bits, 2 fence setups)
- Clamping – None required
- Uses – Drawers, rails, stretchers
Start the socket with a straight bit to make the dovetail bit’s job a little easier.

Set the bit at full height and rout the socket. Keep the stock against the table throughout the cut.
The sliding dovetail’s selling point is strength. Unlike the previous joints, it does not need pins, keys, or (when done well) glue; the dovetail on one piece slides into a socket in the other. This joint can be used without glue (on breadboard ends, for example) when you want to allow for wood movement. This attribute translates to easy assembly without needing clamps.
The joint isn’t difficult to make, but the fit must be precise. Too loose, and it won’t work; too tight, and it may seize up as you try to slide the pieces together. Longer joints require a slightly looser fit, otherwise they might get stuck midway. I reserve it for relatively narrow work and make sure my stock is accurately jointed and planed.
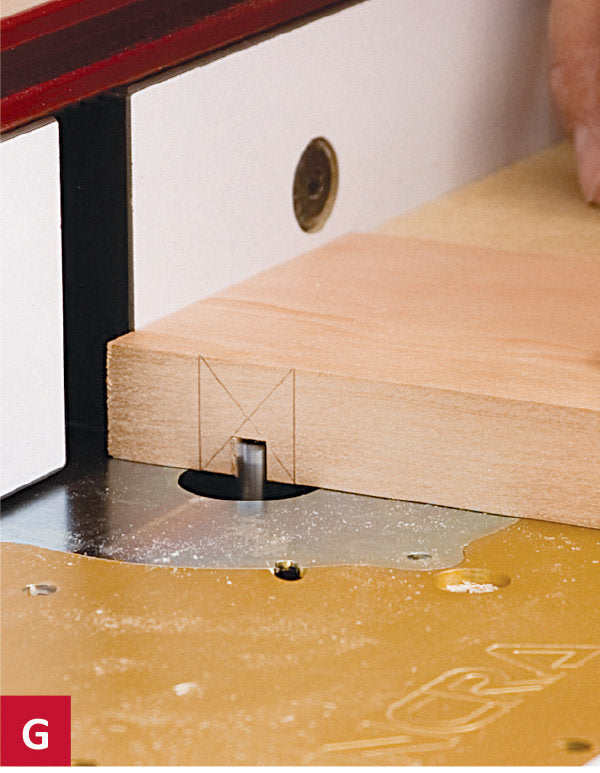
Rout the socket first. To do this, mark the centerline of the cut. Then outfit your router with a straight bit thinner than the thinnest section of your dovetail bit, and hog out the bulk of the waste (Photo G). Without changing the position of the fence, install a dovetail bit, set the bit to full depth, and rout the socket (Photo H).


Cut the back to fit. Set a spacer within the drawer as shown; then transfer the length of the back.
Without changing the height of the bit, attach the fence and rout the tails on the ends of your sides (Photo I). As with the dovetail keys, partially recess the bit into the fence, and rout both faces of your side stock. Test-fit the resulting dovetail in one of the sockets. The joint should go together with firm hand pressure or a light tap from a mallet.
The trickiest part of making a sliding dovetail drawer is cutting the back to length. After routing the front ends of the sides, rout sockets in the sides and assemble your “backless” drawer. Transfer the socket-to-socket length as shown (Photo J). Cut the back to fit, rout dovetails on both ends. and assemble your finished drawer.


