
Use power tools to make hand-cut dovetails in record time.
If the overall design of a piece gets my attention, the first thing I do is walk over and open up one of the drawers. Like interior stitching on a fine suit, drawer joinery is a sign of the maker’s skill and an indication of the overall quality of the piece. Finding a nicely dovetailed drawer is always a pleasant surprise.
A traditional drawer made with half-blind dovetails joining the front–a strong and time-tested method–is a fitting complement to the one-drawer table on page 56. Don’t assume that making the half-blind dovetails on the drawer front and sliding dovetails in the back requires expertise with hand tools or the help of some pricey jig.
After experimenting with a variety of different drawer making techniques, I’ve come up with an approach that employs a combination of hand and power tools. The finished drawer (Figure 1) appears hand-cut, but requires less layout than the traditional method and takes a fraction of the time to complete. In addition, the resulting drawer fits the opening every time.
Note: You’ll need a dovetail bit with a minimum cutting height of 1⁄2". Almost any dovetail angle will work, but I recommend a 14° bit, such as Whiteside’s D14-55 (Woodcraft #24D42, $24.99).

Use the opening to size the parts
After milling your materials to rough dimensions, refer to the actual drawer opening. Mark the width of the sides and drawer front directly off the height of the drawer opening, and then rip them to width. Test the sides in the opening; aim for a smooth sliding fit with no more than 1⁄32" of slop (Photo A). Then crosscut the sides 1⁄2" shorter than the full depth of the opening. Trim the front so that it fits with no more than a 1⁄32" gap at both ends.
Groove the front and sides for the bottom panel where shown in Figure 1. For a single drawer, I’ll groove the parts by taking two passes with a standard-width blade. Set the top edges of the sides and top against the fences and cut the groove up from the bottom edge. Next, raise the blade and rip the back to width.
Glue up enough stock to make the drawer bottom about 1⁄2" oversize. You’ll trim it to final length and width after the drawer is assembled.

Rip the sides to width and then test the fit in the finished drawer opening. The sides should neither wiggle nor bind.

Rout the front edges of the sides, using a right angle sled to support the stock. Adjust the fence so that the bit doesn’t cut into the bottom groove.
Rout the tails
On the front end of the side pieces, lay out a centerline across the width, as shown above. Next, make a right angle sled like the one in Photo B. Chuck your dovetail bit into a table-mounted router and adjust the bit’s height to 1⁄2". Set the fence so that about half the bit cuts through the stock. Make sure that it doesn’t cut into grooves on the drawer sides. Rout the front end of each drawer side as shown.
Using the centerline as a guide, reposition the router table fence and rout through the sides as shown in Photo C. (If your sides are particularly hard or thick, notch the centerline at the tablesaw before routing.)

Using the centerline as a guide, rout the center notch. Clamp the side to the sled to prevent shifting.

Trace the tails to establish the pins. Use the bottom groove to correctly orient the parts.

Rest the teeth on the waste side of the line, tilt the blade to match the pin, and saw to both baselines.

Rout and pare the pins
Set your marking gauge to equal the thickness of the drawer side, and scribe a line on the inside face of the drawer front at each end. Clamp the drawer front upright in your vise, and adjust the height so that the end of the stock sits flush with the upper face of a flat piece of scrap stock. Set your drawer side atop the scrap, and position the tails directly on the end of the drawer front. Line up the tail baseline of the pins with the inside face of the drawer front, and then use a marking knife to trace around the tails, as shown in Photo D. Extend the lines down the inside face of the drawer front using a square and marking knife. To make the knife lines easier to see, it often helps to go over them with a pencil. (With walnut stock, I use a white lead pencil.)
With the work clamped upright, saw along the pin lines (Photo E). Make sure to stop the cut at the knifed baselines on both the end and inside face of the stock.
Now, chuck a 1⁄4" straight bit into a handheld router and hog out the waste. Adjust the bit height to match the length of the tails and set the guide fence to the thickness of the drawer sides. Double-check these two settings, making sure that they will prevent you from routing past your scribed lines. Now clamp the drawer front face-up on your workbench and rout away the waste (Photo F), working as close to the sawn lines as you’re comfortable. The remaining waste can be pared away with a chisel, as shown in Photo G. Working from both the inside face and the end of the stock, trim away the waste to match the depth of the two routed baselines.
Test the fit of the tails in their sockets. To prevent damaging the joinery, keep the boards perpendicular to each other when fitting. If the fit needs to be tweaked, trim only the pin cheeks, not the tail cheeks.


Sneak up on the tails. Realize that a minor fence adjustment will be twice that on the routed tail.

Adjust the tail width so that the parts slide together with hand pressure.

Rout the back
The back of this drawer is joined using a sliding dovetail. The dovetail slots on the drawer sides and the dovetailed ends on the drawer back are both cut at the router table with the same bit used to cut the tails at the front of the drawer.
Rout the sides first. Adjust the bit height to 1⁄4". Using a square backer block to guide the work, rout a dado on the inside face of one side piece about 1" in from the back end (Photo H). Repeat the cut on the second side.
To determine the exact length of the back, you need to know the inside width of the assembled drawer at its front. Dry-fit the half-blind joints and measure the inside dimension between the sides. To that, add the combined depth of the dovetail slots. (In this case it should be 1⁄2", but double-check the exact depth of your actual slots.) Then cut the back to length.
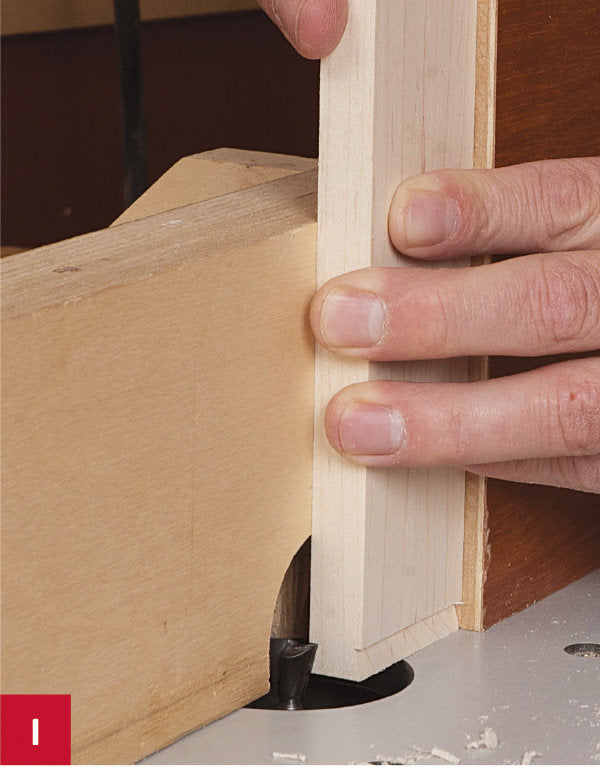
To cut the sliding tails on the ends of the back, leave the height of the bit as is, but adjust the fence so that only a quarter of the bit is visible. Using test stock milled to the same thickness as your back, rout an end. Use a backer board run against the fence to keep the stock upright and square as it crosses the bit. Rout both sides, and then test the fit of the tail in its slot. Once you’re satisfied with the fit, rout the back as shown in Photo I. Dry-fit the joint to make sure everything slides snugly but smoothly into place, as shown in Photo J.


Assemble the drawer
Working on a flat surface, apply glue to the front, sides, and back, and assemble the drawer. Arrange your clamps so that they pull all four joints closed in both directions, as shown in Photo K. Tighten the clamps, and measure for matching diagonals to make sure the assembly is square. If the drawer does not sit flat on the bench, pull it down with clamps.
After the glue dries, cut the drawer bottom to fit. Rabbet the underside of the front and sides of the drawer bottom at the table saw, as shown in Photo L. Using the miter gauge at your tablesaw, cut a 5⁄8"-deep notch along the back edge of the drawer bottom, where shown in Figure 1. Bevel the bottom edge of the notch with a chisel so that you can countersink a screw. Slide the drawer bottom into place (Photo M), and screw the back edge to the back of the drawer.

Final fitting
Most drawers need a little additional guidance to run smoothly. Drawer guides prevent the drawer from sliding in at an angle. To attach the guides, insert the drawer into the opening and set the guides on either side. For clearance, shim between the guides and the drawer with 1⁄64"-thick spacers, and then screw the guides into place (Photo N).
It’s unlikely that the drawer will stick out of the opening, but if it does, simply trim the back ends of the sides. If the drawer slides in too deeply, attach two spacer blocks to the rear apron so that the drawer front closes flush to the front apron.


